An outdoor projector usually looks washed out because the screen is receiving too much light, not because the projector is automatically too weak.
Check the screen-facing light, viewing time, image size, and real ANSI brightness in that order. If blacks look gray but text edges are still sharp, this is not mainly a focus problem. It is a contrast problem.
A useful first test takes 2 minutes: pause on a dark movie scene, turn off nearby patio or porch lights, and watch whether the blacks deepen.
Then test again 30–45 minutes after sunset. If the same projector suddenly looks stronger, the problem is not the projector alone.
The screen zone was too bright, the movie started too early, or the image was stretched too large for the available light output.
Ambient Light
Diagnose the screen face first
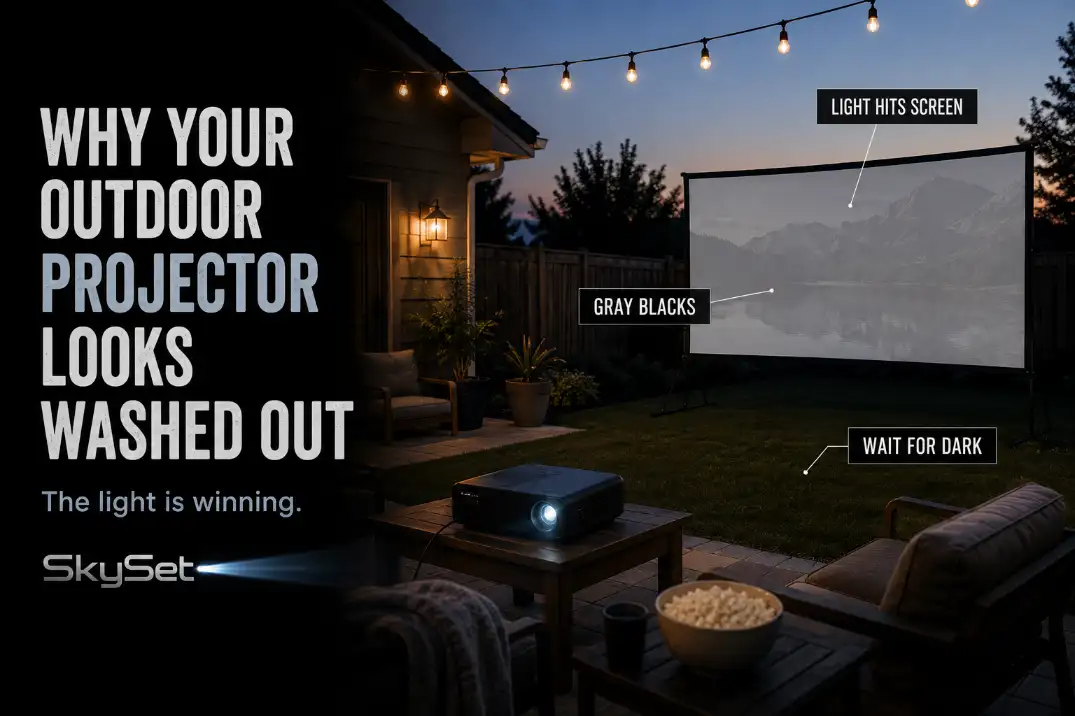
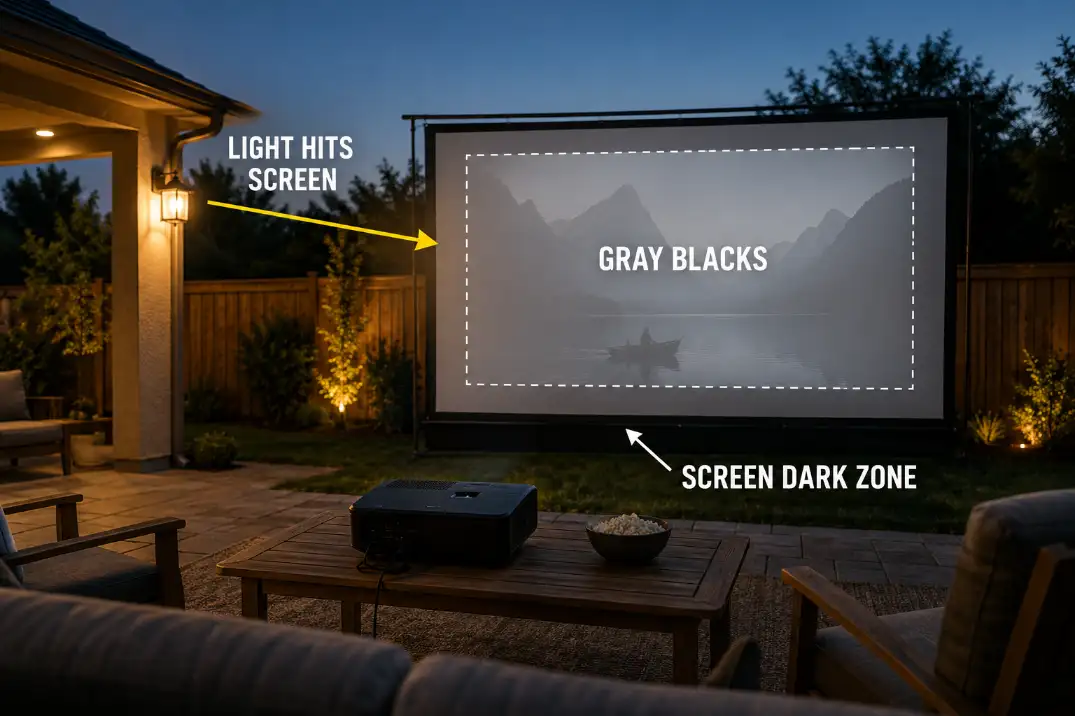
Outdoor projection depends on reflected light. The projector sends light to the screen, and your eyes see what bounces back. That means the screen must preserve the dark parts of the image.
When porch lights, patio bulbs, windows, or remaining sky brightness hit the screen face, the black parts of the movie are no longer truly dark before the projector image even lands.
That is why washed-out projection can look confusing. Bright menus may seem acceptable, while night scenes lose depth. Shadows disappear. Faces look flat. The projector may still be focused, but the picture has no contrast.
Use the blank-screen test
Before changing projector settings, turn the projector off and look at the blank screen from the seating area. If the surface is visibly glowing from patio lights, house windows, string lights, or dusk sky, the movie will begin with raised black levels.
That glow is the symptom. The mechanism is simple: the screen is already lit before the projector adds the image. A brighter picture mode can increase light output, but it cannot fully restore black depth on a screen that is being lit by the yard.
Quick diagnostic checklist
- Blacks look gray even when the image is sharp.
- The picture improves within 1–2 minutes after nearby lights turn off.
- Dark scenes fail more than cartoons, sports, or bright menus.
- The blank screen is visibly lit before the projector turns on.
- The image improves 30–45 minutes after sunset.
- A 100-inch image looks stronger than a 120-inch image from the same projector.
If several of these are true, fix the screen environment before shopping for a new unit.
This is one of the most common setup-level failures behind broader backyard movie setup mistakes, especially when the yard looks ready before the movie actually starts.
Screen Direction
Face the screen toward the darkest usable view
Screen direction is often treated as a convenience choice, but it directly affects picture quality.
A screen facing a bright patio door, white siding, porch fixture, kitchen window, or reflective wall will usually look weaker than the same screen turned toward a darker fence, hedge, garage side, or unlit part of the yard.
Stand where the screen will sit and look straight out from the screen face. If it points toward the brightest part of the yard, the setup is already working against the projector.
Rotating the movie zone 45–90 degrees can sometimes improve contrast more than changing brightness settings.
Angle can beat material
A better screen does not cancel bad light direction. Even ambient-light-rejecting screens work best when the projector and unwanted light do not arrive from similar directions.
If a light source hits the screen from near the projector’s line, the screen may reflect that light back toward viewers along with the image.
This is why screen direction includes both what the screen faces and where the light comes from. A screen can be technically good and still look washed out if the brightest fixture, window, or open sky is sitting at the wrong angle.
Setup Note: Mark the screen outline, then shine a flashlight from each nearby light source. If the beam lands on the screen face, that light should be moved, shielded, dimmed, or aimed down.
Weak Brightness
Brightness matters after light control
Projector brightness matters, but it should not be the first excuse. A projector advertised as bright can still look weak if the screen is lit by the yard.
A more modest projector can look acceptable after dark if the image is smaller, the screen is clean, and direct light is controlled.
For many casual backyard movie nights, a real 2,500–3,500 ANSI-lumen projector is a more realistic starting range for a 100-inch image after dark.
Larger screens, earlier viewing, and nearby lights raise the demand. A 120-inch picture is not just “a little bigger.” It spreads the same light over much more area.
Image size quietly lowers brightness
A 100-inch 16:9 image covers about 30 square feet. A 120-inch 16:9 image covers about 43 square feet. That means the same projector has to spread its light over roughly 40% more screen area at 120 inches. Perceived brightness drops, even though the projector itself has not changed.
This is the condition many people underestimate. They think the projector is failing, when the real issue is that the picture was made too large for the light output, viewing time, and screen environment.

Watch the lumen wording
ANSI lumens are more useful than vague marketing brightness numbers because they refer to a standardized projector light-output measurement.
Some projectors advertise very large lumen figures that do not behave like real ANSI brightness in a backyard. If the listing does not clearly state ANSI lumens, do not compare that number directly with a projector that does.
This matters because washed-out projection often leads to the wrong purchase. A buyer sees a huge advertised brightness number, expects a daylight-capable outdoor image, and still gets gray blacks because the screen is too large, the patio lights are on, or the movie starts during twilight.
| What changed | What improves | What it proves | Best next move |
|---|---|---|---|
| Patio lights turn off | Blacks deepen quickly | Screen-facing light was the main issue | Move, shield, or dim lights |
| Movie starts later | Contrast improves gradually | Sky brightness was still too high | Start after darker twilight |
| Image shrinks from 120 to 100 inches | Picture looks stronger | Light was spread too thin | Keep smaller size or upgrade |
| Real screen replaces sheet or wall | Color and contrast improve | Surface was scattering light | Use outdoor screen material |
| Full darkness still looks weak | Image remains flat | Projector output may be too low | Compare real ANSI brightness |
When a brighter projector makes sense
A stronger projector becomes a sensible fix only after the screen face is dark, the viewing time is late enough, the image size is reasonable, and the screen surface is not fighting the image. If the picture still looks thin after those checks, brightness may truly be the limiting factor.
Buying more lumens too early is the fix that often wastes money. It can make menus, sports, and bright animation look punchier, but it will not fully solve a screen being washed by patio light.
Wrong Screen Surface
Use walls and sheets for testing, not final viewing
A white wall, garage door, sheet, fence panel, or painted surface can prove that the projector turns on and throws an image. It is rarely the best final screen.
Texture scatters light. Off-white color shifts the image. Wrinkles create uneven focus. A surface without backing can allow background brightness to interfere with contrast.
A matte white outdoor screen around 1.0 gain is usually the safer baseline for backyard movie nights. It gives a predictable image without narrowing the viewing angle too much.
Higher-gain screens can look brighter from the center seat, but they can also create hot spots or look weaker from side seats if the setup is not aligned well.
Black backing can matter outdoors
Outdoor screens often sit in front of fences, windows, patios, light-colored walls, or open yard space. A thin sheet or unsupported fabric can allow background brightness to bleed through or create a weak, uneven image. A screen with proper backing helps the projected picture feel more solid.
This is where screen size and surface quality overlap. A rough garage door at 120 inches is a much harder target than a clean outdoor screen at 100 inches.
If the picture looks washed out, do not jump straight into color settings. First ask whether the projector is covering a surface that is too large, too textured, too reflective, or too thin.
The limit of screen upgrades
A better screen helps most after direction and lighting problems are already controlled. It will not make a weak projector look strong at a huge size before dark.
It will not cancel a porch light shining across the screen. It will not fix a movie zone facing a bright patio door.
Patio Lights
Separate people light from screen light
A backyard movie night still needs safe walking, snack access, and enough light to avoid cords. The mistake is letting comfort lighting become screen lighting. The screen wants darkness. People need controlled, low, indirect light.
Low path lights, shielded step lights, dim lamps behind the seating area, and downward-facing fixtures usually work better than exposed bulbs near the screen.
A small light near a snack table can be fine if it points down and stays behind the projector line. The same light becomes a problem if it shines across the screen or reflects off pale siding.
String lights are easy to overestimate
String lights feel soft, so they seem harmless. They can work well behind the audience or along a fence away from the screen.
They become a contrast problem when they hang above the screen, beside the screen, or across the screen-facing side of the patio.
The practical test is simple: turn the projector off and look at the screen. If decorative lighting makes the blank screen glow, it will also flatten the movie.

Better Viewing Time
Sunset is not projector darkness
A lot of outdoor projector disappointment comes from starting the movie too close to sunset. The yard may feel dim to your eyes, but the sky can still be bright enough to lift the screen’s black level. That effect is especially obvious on large screens and dark movies.
For many backyard setups, the image starts becoming more convincing 30–45 minutes after sunset. Around 60 minutes after sunset, the screen often has a better chance of holding contrast, assuming nearby lights are controlled.
The exact timing changes by season, weather, location, and yard exposure, but the principle stays the same: sunset is not the same as full viewing darkness.
Use the early window for setup
The better routine is to set up early and start later. Use the remaining light to place the screen, route cords, check speaker coverage, adjust seating, and test the projector. Then start the movie when the screen zone is dark enough to hold black levels.
This also keeps picture quality from fighting the rest of the setup. If seating, cord routing, screen stability, and sound are still being adjusted after dark, the movie starts with distractions.
A better sequence is to prepare the space first, then use the darker window for viewing. The full layout order in Backyard Movie Night Setup works well when the projector image is only one part of the night.
When waiting stops helping
Waiting longer will not fix everything. If the screen faces a lit window, the image is oversized for the projector, the screen is a wrinkled sheet, or a patio bulb shines across the screen, the picture can still look flat after dark.
At that point, stop treating time as the fix. Use the better order instead: darken the screen face, turn the screen away from light, reduce image size, check the screen surface, then judge projector brightness.
The strongest outdoor projector fix is rarely one setting. It is a cleaner setup hierarchy: protect the screen from light first, keep the image size realistic, use real ANSI brightness expectations, and start the movie after the yard has actually gone dark.
For a simple official explanation of why sunset still leaves usable outdoor light, see the National Weather Service guide to twilight.