A good backyard movie setup for beginners is not the biggest projector, the tallest inflatable screen, or the loudest speaker bundle.
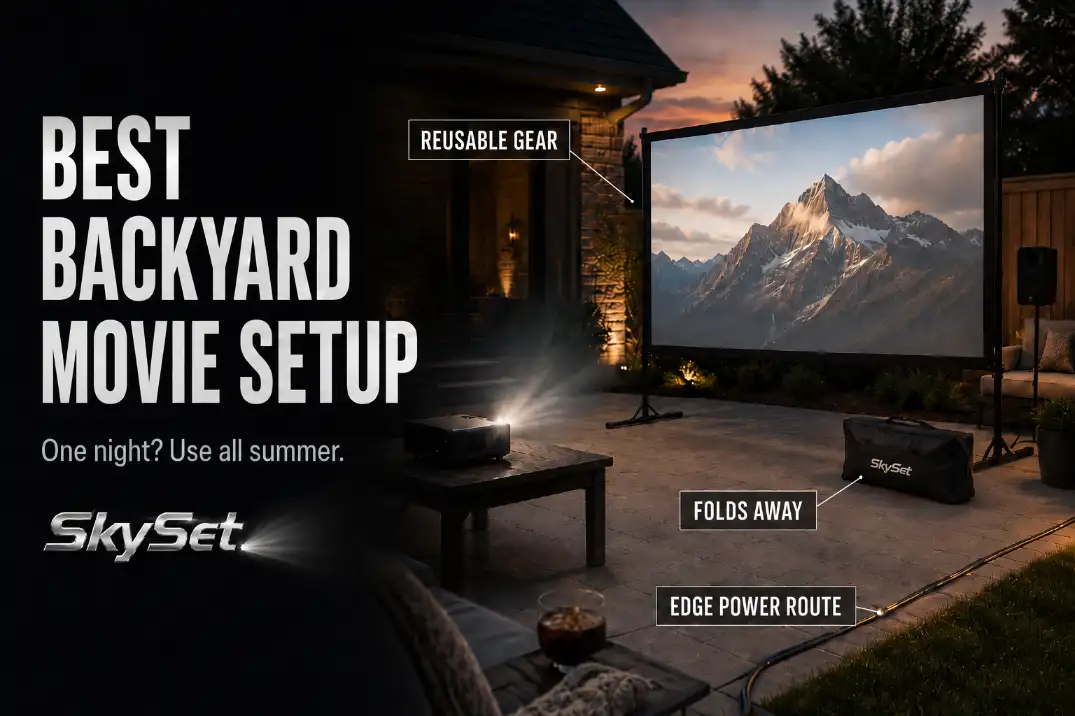
The best starter setup is gear you can reuse: a portable projector, a stable screen, enough sound for your seating area, and a power route that does not cross the path people use in the dark.
Before buying anything, confirm three things: whether your yard can get dark for at least 90 minutes, whether you have about 8 to 12 feet of projector distance, and whether a cord can reach the setup without running through the walking route.
This is different from planning a one-night party. A one-night setup invites cheap props and oversized gear.
A reusable backyard movie setup favors compact equipment that stores easily, works on a patio or lawn, and does not become annoying after the first use.
Start With Gear You Will Reuse
The beginner mistake is buying for the fantasy version of the night: giant screen, dramatic lights, themed seating, multiple speakers, and a complicated media setup.
That looks exciting in a cart, but it often creates a backyard system that takes 45 minutes to assemble and feels too much trouble to use again.
A better starter setup should be simple enough to use on a normal Friday night. If the projector, screen, speaker, and cords can be brought outside, connected, tested, and cleaned up in about 15 to 25 minutes, the setup is far more likely to become part of summer instead of a one-time event.
Reuse matters more than maximum size
For most beginner yards, an 80- to 100-inch screen feels large enough from typical seating distances. Jumping to 120 inches sounds better, but it demands more projector brightness, more yard depth, more wind stability, and more storage room. The screen size should match the yard, not the product photo.
The same rule applies to projectors. A starter projector that can also work indoors, in a garage, on a covered patio, or for kids’ sleepovers has more value than a “backyard-only” gadget that needs perfect darkness and careful handling every time.
The first buying filter
Do not start with brands. Start with the failure points. The setup needs a stable image, readable sound, safe power, and simple storage. If a product does not help one of those four things, it is not essential for a first backyard movie setup.
Once the goal is a reusable setup instead of a one-night party kit, the first serious purchase is the projector that will be easy enough to bring outside again.
FIRST BUY DECISION
Portable native 1080p backyard projector
Choose a starter projector that is easy to center, stable on a stand or table, and useful beyond one movie night. For most beginners, the better buy is not the biggest spec claim — it is the projector you can set up again in 15 to 25 minutes without fighting focus, angle, or connection issues.
🔴 Shop portable native 1080p projectors for backyard movie setups
What a Beginner Backyard Movie Setup Needs
A beginner setup does not need theater perfection. It needs the few pieces that keep the night from failing after sunset.
The core kit
The practical starter kit is:
- A portable projector that can produce a watchable image after dusk
- A screen or flat surface that stays smooth
- A speaker that carries dialogue to the seating area
- Outdoor-rated power accessories
- Seating that holds people in the correct viewing zone
If you do not already have a smooth wall or garage door that works every time, a screen is not decoration. It is what turns the projector from a gadget into a usable backyard setup.
SECOND BUY DECISION
Freestanding outdoor projector screen
A reusable screen should fold down, store easily, and stay flatter than a bedsheet. For most beginner yards, a stable 80- to 100-inch screen is more useful than a larger screen that takes too long to set up.
🔴 Shop freestanding outdoor projector screens
Buy the first two pieces before the extras
If you are building the setup gradually, buy the projector and screen first. A simple speaker can be added next, and power accessories become essential when the outlet is not already near the projector position.
Seating add-ons should come last because they improve comfort, not the image.
That core kit is enough. Snacks, blankets, pathway lights, and side tables improve the night, but they do not fix a weak image, a wrinkled screen, or a bad cord route.
The real order of setup
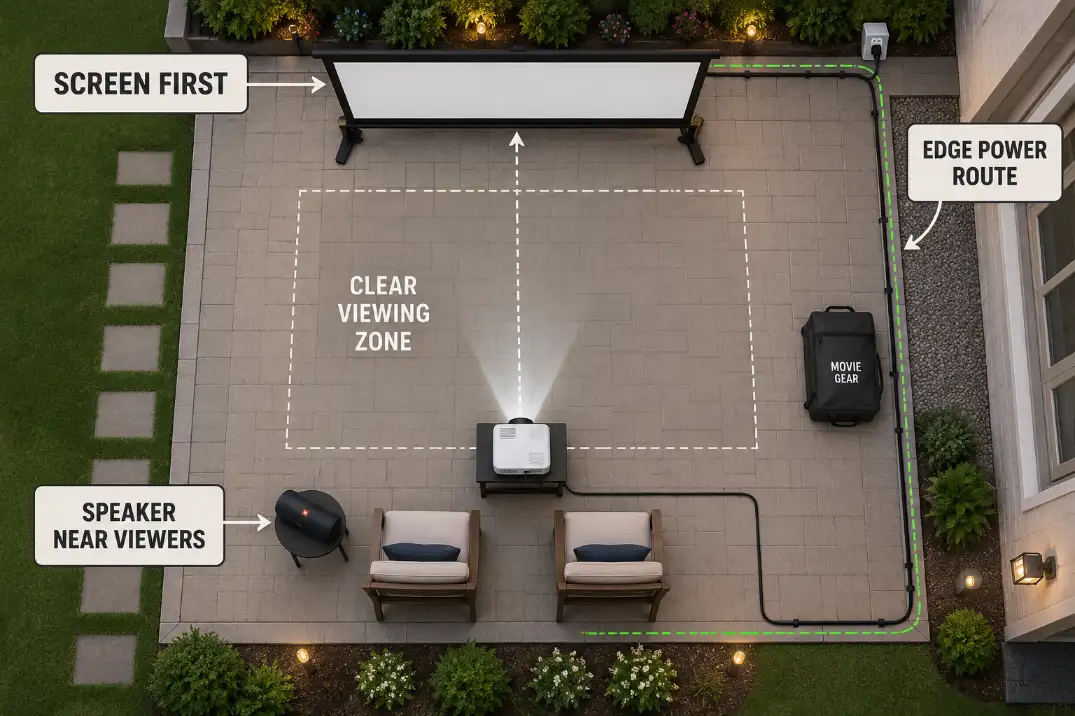
Set the screen first, then place the projector, then test the image size, then place seating. Beginners often reverse that order by setting chairs first and trying to force the projector around them.
That is how you end up with a beam blocked by chair backs, a tilted projector on a side table, or a screen that feels too small from the seats.
If the yard is compact, the projector placement matters even more. A patio that looks roomy in daylight can feel tight once the screen, chairs, beam path, and walking route all compete for space.
For small patios, the placement limits in Small Patio Projector Placement Problems are usually more important than buying a larger screen.
Best Starter Projector
The best starter projector is not always the brightest one on the page. It is the one that can create a stable, watchable image in your actual yard without forcing a strange angle.
Brightness expectations should be realistic
For a backyard movie, the useful window usually starts after dusk, not in full afternoon light. Even a decent starter projector will struggle if the screen is catching porch light, window light, or sky glow.
A projector that looks acceptable indoors can look washed out outside until the yard gets properly dark.
As a practical threshold, if the screen still looks gray and flat 20 to 30 minutes after sunset, the first issue is often ambient light or screen direction, not necessarily the projector.
A brighter unit helps, but it will not overcome a screen facing the wrong light source. The difference between a watchable and failing setup is often whether the screen area is protected from stray light, not whether the spec sheet has the biggest number.
For a deeper brightness decision, How Bright Should an Outdoor Projector Be? explains why outdoor brightness depends on screen size, light spill, and viewing time rather than one simple lumen claim.
Native 1080p matters more than vague claims
Beginner projector listings can be confusing because “supports 1080p” does not always mean the projector displays a native 1080p image. A projector may accept a 1080p signal while projecting at a lower native resolution.
For casual backyard viewing, that may still be watchable, but it becomes more noticeable on larger screens, small subtitles, sports scores, and dark scenes with fine detail.
For a reusable starter setup, native 1080p or clearly stated full-HD output is a safer target than a vague “HD supported” claim.
That does not mean every beginner needs a premium projector. It means the product should be clear about what image it actually produces.
Avoid solving placement with keystone
Auto keystone and focus are useful conveniences. They are not a license to put the projector far off to the side. If the projector sits at a steep angle, keystone correction reshapes the image, but it does not fix the physical beam path or restore lost image area.
A beginner projector should be easy to center, easy to level, and stable on its stand or table. A low, centerline position usually beats a high side-table position, even if the side table is more convenient.
Buying Check: Favor a starter projector that is simple to place and reuse before chasing advanced features. A projector that needs 20 minutes of adjustment every time will not feel beginner-friendly for long.
Best Portable Screen
A portable screen should make the setup easier, not more fragile. The goal is a flatter, cleaner image surface that stores away without turning the yard into a permanent theater.
Bedsheets are the classic false economy
A white bedsheet can work in a pinch, but it often wrinkles, moves in wind, or lets background light show through. That does not always ruin the night, but it makes the image look softer and less intentional.
If you plan to use the setup more than once or twice, a real portable screen is usually worth owning.
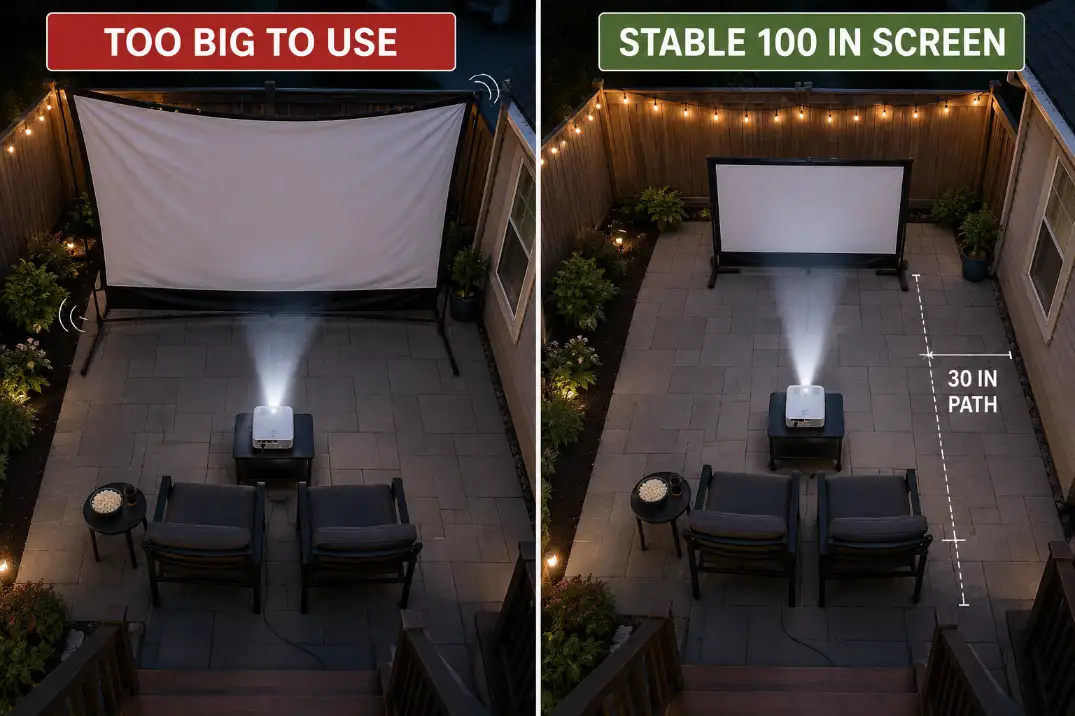
For beginners, a freestanding screen in the 80- to 100-inch range is often a stronger first buy than a huge inflatable screen. It sets up faster, stores smaller, and fits more patios.
Oversized screens are not automatically better if they need extra anchoring, more distance, and more brightness.
That is why the screen decision should happen early. Once the image surface is stable, every other choice — projector distance, seating, speaker placement, and cord route — becomes easier to judge.
Stability beats size in normal yards
A screen that leans, ripples, or twists in light wind is more distracting than a slightly smaller screen that stays flat. In many backyards, a calm evening can still bring 5 to 10 mph gusts. That is enough to move loose screen fabric or a lightweight stand.
For small yards, the better question is not “How big can I go?” It is “What size can I set up in the same spot every time without fighting the frame?”
Best Simple Speaker Setup
Built-in projector speakers are usually the first thing people overestimate. They may sound fine during a daylight test near the projector, then feel thin once people sit 8 to 12 feet away and backyard noise starts competing with dialogue.
Dialogue matters more than loudness
For movie night, the key test is not music volume. It is whether people can understand quiet dialogue without turning the sound harsh.
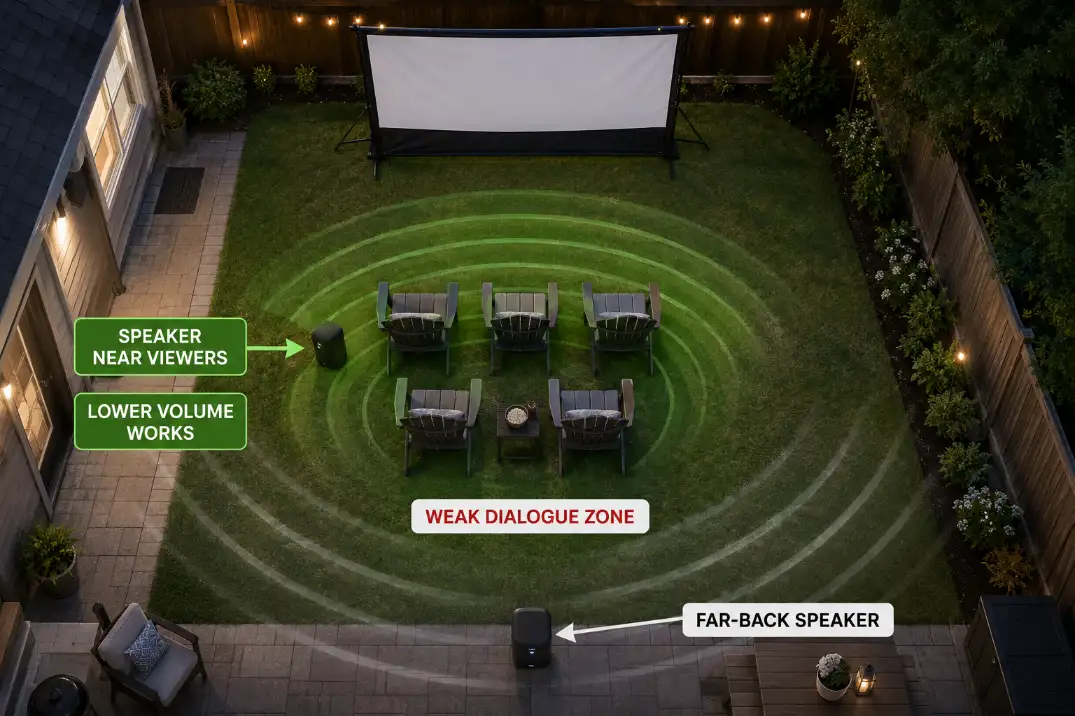
One good portable speaker placed near the seating area or slightly toward the screen side can outperform a small projector speaker firing from the wrong location.
A simple speaker is usually enough for a beginner setup. Surround sound is a later upgrade, not a first requirement. More speakers also mean more charging, pairing, delay, and placement decisions.
Speaker placement changes the result
Put the speaker where viewers hear it clearly without blasting the nearest neighbor. If it sits too far behind the screen or too close to the projector, the sound can feel detached from the image. If it sits beside the seating area, dialogue often becomes clearer at lower volume.
This is where setup beats shopping. A modest speaker in the right spot is often more useful than a larger speaker placed behind guests or too far from the listening zone.
For more placement detail, Outdoor Speaker Placement for Backyard Theater covers the difference between loud sound and usable sound coverage.
Power Accessories Worth Owning
Power accessories are not the glamorous part of a backyard movie setup, but they are one of the few purchases that still make sense outside movie night.
Outdoor-rated cords, cord covers, and weather-aware routing can also help with patio lights, tools, seasonal decor, and temporary outdoor work.
Outdoor-rated is not optional
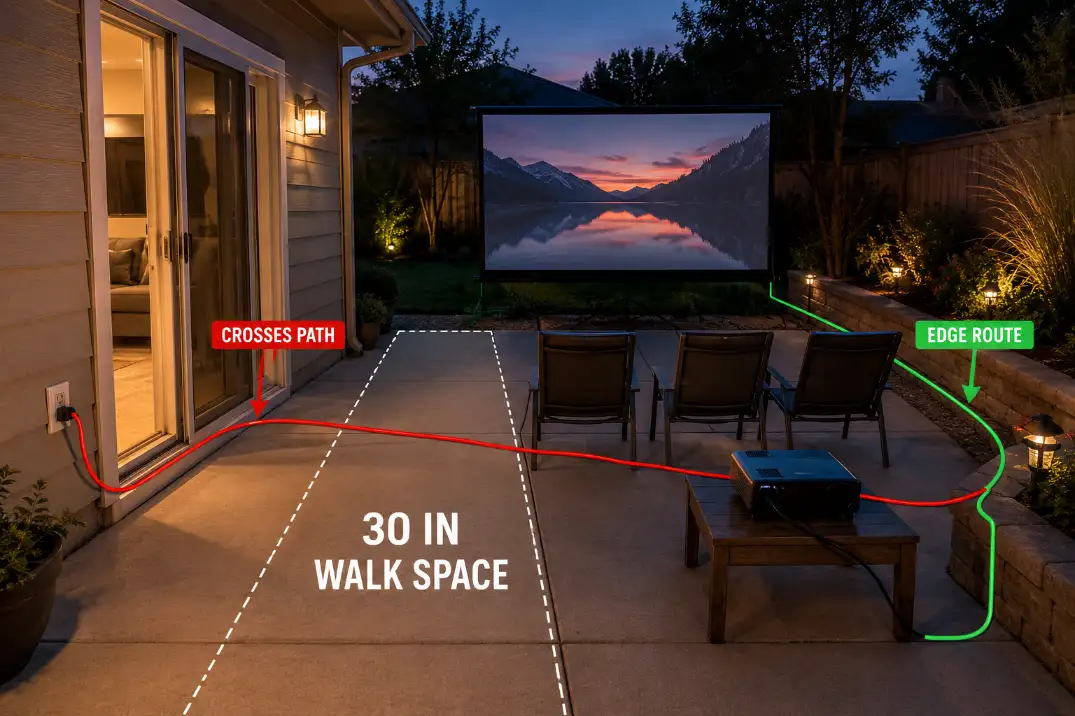
If the setup uses household power, use an outdoor-rated extension cord in good condition. Do not run cords through doorways, under rugs, across wet grass, or through the middle of the walking route.
The problem is not just electrical safety; it is also the fact that people move differently after dark.
A cord that looks obvious at 7 p.m. can disappear after the movie starts. If guests will walk to snacks, the back door, or the side gate, keep the power route along a wall, fence edge, or patio border.
Power route comes before seating
A common beginner mistake is setting the screen and chairs first, then discovering the outlet is on the wrong side. That usually leads to a cord crossing the path. Instead, identify the outlet first, choose the cord route second, and place seating after the cable path is clear.
If the cord must cross a walking zone, the setup is not finished. It needs a different equipment position, a different outlet, or a cord cover made for temporary pedestrian use.
For outdoor AV-specific routing problems, Weatherproof Cable Management for Outdoor AV is more useful than simply buying a longer cord.
Longer cord runs should be treated as part of the setup, not an afterthought. Once the outlet is more than a short patio reach away, cord rating, route, and trip protection matter more than cord length alone.
If the outlet is not already beside the projector position, power gear is no longer an accessory — it is part of the setup.
POWER ROUTE DECISION
Outdoor-rated extension cord
If the cord has to cross a door, patio path, or seating route, the setup is not ready yet. Start with an outdoor-rated cord long enough to follow the patio edge instead of cutting across the walking path.
🔴 Shop outdoor-rated extension cords for backyard movie setups
Seating Add-Ons That Still Make Sense
Seating add-ons are worth buying only when they improve normal outdoor use.
A blanket basket, outdoor cushions, low side table, or folding chairs can make sense because they work beyond movie night. The weak purchases are themed props that look cute once and then take up storage.
Place seats after the image is confirmed
Do not guess seating distance before testing the image. For an 80- to 100-inch screen, many viewers feel comfortable around 8 to 12 feet away, depending on eyesight, screen height, and projector resolution.
Too close can make the image feel large but tiring. Too far makes dialogue and small screen details harder to follow.
The best beginner setup usually has fewer seats placed well, not too many seats squeezed into a wide arc. If people sit far off to the side, they may see a dimmer or distorted image, especially on budget screens.
Comfort should not block function
Chairs, blankets, coolers, and snack tables should not sit in the beam path or the walking path. This sounds basic, but it is exactly where many backyard setups fail.
The yard looks cozy, then someone moves a chair into the projector beam or trips around a cooler during the movie.
Keep at least a 30-inch walking route where people need to pass. If your patio cannot hold that route plus chairs plus projector placement, scale down the setup before adding more gear.
What to Skip
The easiest way to waste money is to buy upgrades before the starter system works. Beginners usually do not need the largest screen, complex audio, permanent mounts, or decorative lighting near the screen.
Skip the oversized first setup
A huge screen can make a small projector look worse. It spreads the same light over a larger area, makes placement harder, and catches more wind.
If the yard is small or the projector is modest, a smaller stable image often beats a dramatic screen that looks dim and unstable.
Skip bright decor near the screen
String lights, porch lights, and path lights can make the yard feel finished, but light near the screen is often the reason the image looks weak. Keep decorative light behind the viewers, low to the ground, or away from the screen face.
This is a symptom-versus-mechanism issue. The symptom is a washed-out image. The mechanism is light landing on the screen or in the viewer’s line of sight. Buying a new projector may not fix that if the screen is still being lit from the side.
Skip gear that lengthens setup time
If the setup takes too long, it stops being casual. Avoid equipment that needs complicated inflation, multiple anchors, fragile adapters, or repeated pairing steps unless you know you will use it often. Beginner gear should reduce friction, not create a second hobby.
For a broader list of setup choices that look logical but cause problems after dark, Backyard Movie Setup Mistakes is a stronger next read than another product roundup.
Simple Backyard Movie Setup Checklist
Use this checklist before guests arrive, not after the movie starts.
- Screen stands flat and does not twist in light wind.
- Projector has a clear centerline beam with no chair backs in the way.
- Image looks watchable after dusk, not only in a close-up test.
- Speaker makes dialogue clear from the main seats.
- Outdoor-rated cord follows an edge route, not the walking path.
- Seating leaves about 30 inches of usable movement space.
- Streaming, HDMI, battery, or Wi-Fi source is tested at least 20 minutes before start time.
| Setup Choice | Better Beginner Pick | Usually Worth Skipping First |
|---|---|---|
| Projector | Portable 1080p-friendly starter unit | Ultra-cheap novelty projector |
| Screen | 80- to 100-inch freestanding screen | Huge inflatable screen for a small yard |
| Sound | One clear portable speaker | Complex surround system |
| Power | Outdoor-rated cord and edge route | Indoor cord across the path |
| Seating | Existing chairs plus useful cushions | Theme props used once |
Questions People Usually Ask
Is a backyard movie setup worth buying for beginners?
Yes, if you buy reusable gear instead of party props. A projector, portable screen, speaker, and outdoor-rated power accessories can be used for summer movies, sports nights, kids’ events, garage viewing, and casual patio use.
Should I buy the projector or screen first?
Choose the screen size first, then buy or place the projector around that size. The screen determines viewing distance, projector distance, and how much brightness you need.
Buying the projector first without knowing the screen size often leads to placement problems.
Is a speaker necessary for backyard movies?
Usually, yes. Built-in projector sound is often too small once viewers sit several feet away. One simple speaker placed near the viewing zone is usually enough for beginners and is more useful than a complicated audio system.
What is the most common beginner mistake?
The most common mistake is treating the setup like a shopping list instead of a layout. The gear can be decent, but the night still fails if the screen catches light, the projector is off-center, the speaker is too far away, or the cord crosses the walking path.
Because temporary power is the one part of a backyard movie setup that can create a real safety risk, review the U.S. Consumer Product Safety Commission extension cord guidance.