The real decision is not whether the finished picture can be made rectangular. It is whether the uncorrected projection is already close enough that digital keystone only has to trim the edges.
Keystone can square a picture even when the projector remains too low, too high, or too far to one side. That convenience is useful in a temporary backyard setup, but it can also hide weak physical alignment.
A small adjustment is reasonable when the projector is stable, nearly square to the screen, and producing even focus. Move the projector when the raw image is strongly distorted, the corners will not focus together, or the corrected picture looks noticeably softer. If the projector includes optical lens shift, that belongs between those two choices: correct the optical position first, then use keystone only for what remains.
What Keystone Correction Changes
Treat keystone as image processing, not projector placement. It reshapes the image sent through the projector; it does not level the stand, rotate the screen, move the lens, or make the projector face the screen more directly.
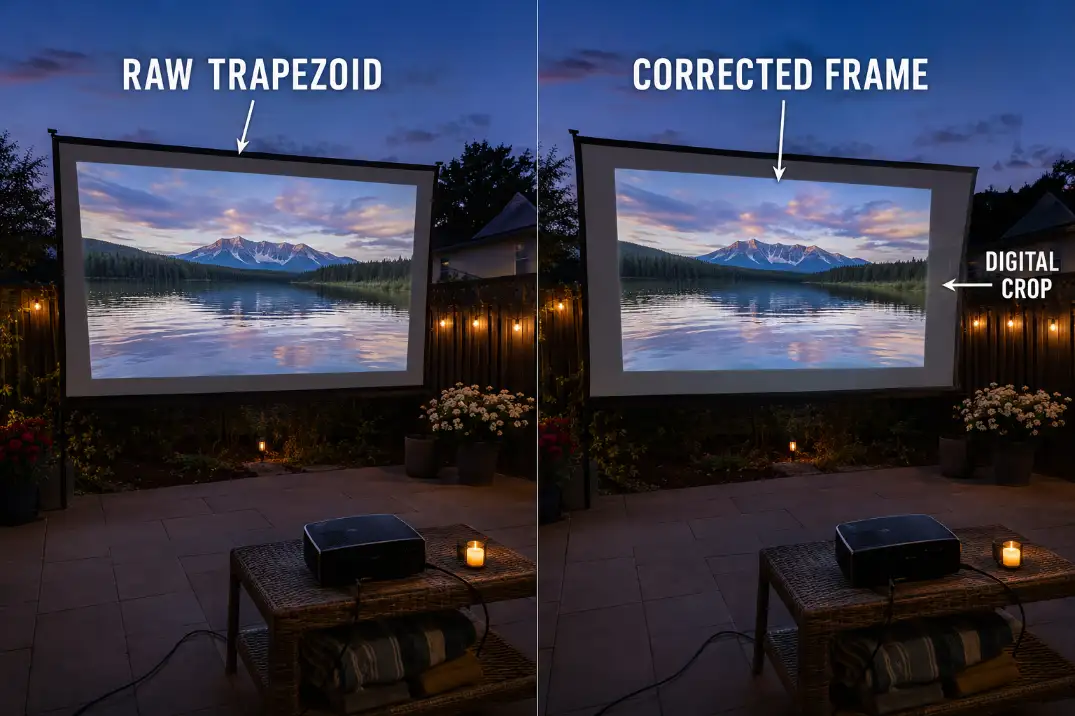
When the projector aims upward, downward, or across the screen from one side, the raw picture can become a trapezoid. Digital keystone pre-shapes the picture in the opposite direction so the visible result appears rectangular.
Vertical correction adjusts an image that is wider at the top or bottom. Horizontal correction addresses side-to-side distortion. Four-corner systems allow individual corner adjustments. Automatic keystone performs similar digital work using sensors or a camera; automation does not turn it into an optical correction.
The corrected picture may occupy only part of the available imaging area. A faint trapezoidal light boundary can also remain around the rectangular frame, particularly during dark scenes.
None of this makes keystone useless. When the projected shape is already close, a small adjustment can be the simplest finish for a portable movie night. When throw distance, support height, or physical alignment is substantially wrong, resolve the broader outdoor projector placement problems before trying to reshape the result.
Why the Image Can Look Softer
Softness becomes the decision boundary when digital correction is doing more than finishing the image. Keystone must remap the source into a different shape, which can disrupt clean pixel mapping and reduce fine definition.
The effect often appears first in subtitles, menu text, diagonal lines, repeating patterns, and detailed faces. Normal movie scenes may still look acceptable while small text near the screen edge loses clarity.
Projector angle can create a second problem that keystone cannot repair. When the lens is not sufficiently square to the screen, one side of the screen sits farther from the lens than the other. The center may focus correctly while an edge or corner remains soft. Digital correction changes the frame shape; it does not make the screen and optical focus plane parallel.
The visible cost varies with correction amount, native resolution, image size, content, and viewing distance. A slight adjustment on a modest image may be difficult to notice from the main seats. Heavy correction across a large screen makes the compromise easier to see.
Use the actual seating position as the standard. If subtitles remain clean and all corners focus acceptably, mild correction may be reasonable. If the picture looks square but never evenly sharp, more keystone is not the answer.
Crooked Patio Layouts
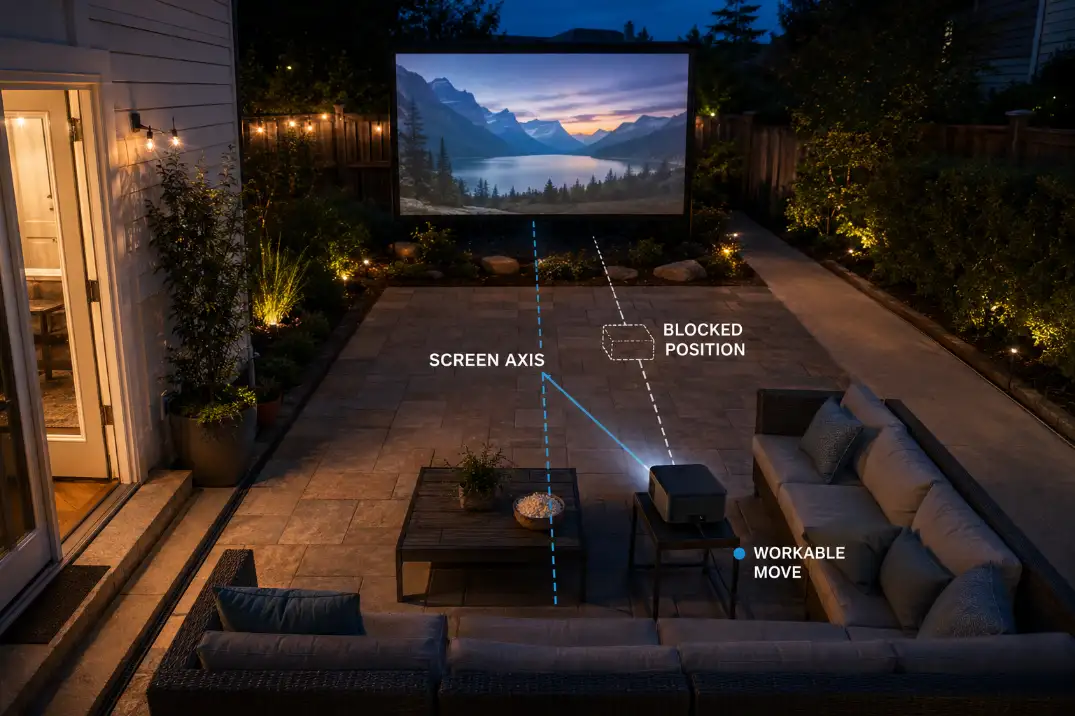
A sharper picture is not a better setup if the projector move blocks a door, cuts through the walking route, or puts the beam through viewers. Real patio use sets the practical limit on physical alignment.
The theoretical projector position may land in front of a sliding door, on soft ground beside the patio, behind a tall chair, or where the power cable must cross foot traffic. In those conditions, a modest off-axis position with mild correction can be safer and easier to repeat.
The boundary is visible in the raw image. Keystone can finish a projection that is already reasonably close to rectangular. It should not conceal an extreme side angle or a projector aimed sharply upward.
Moving both parts of the setup can sometimes work better than moving only the projector. A small screen rotation combined with a modest projector shift may create a cleaner shared axis without taking over the patio. Reducing the image size can also open a stable position that a larger picture makes impossible.
Layout judgment: Accept mild keystone when the corrected picture remains clean and the physical alternative creates blocked access, an unsafe cable route, or an unstable support.
Compact spaces need this judgment more than open lawns. The recurring constraints covered in small-patio projector placement limits can help when furniture, walls, and walking access leave only one or two usable positions.
Lens Shift Limits
Choose lens shift when the projector body is already level and square to the screen but the image lands slightly too high, low, left, or right. It moves the projected image through the optics instead of digitally reshaping it.
Because the source is not being compressed into a corrected trapezoid, lens shift generally preserves native image mapping better than keystone. It is the cleaner middle option when physical angle is correct but image position is not.
Its range is never universal. Some projectors provide only vertical shift. Others offer limited horizontal movement, and maximum vertical and horizontal ranges may not be available simultaneously. Moving one control near its limit can reduce the remaining adjustment in the other direction.
Fixed lens offset is also different from adjustable lens shift. Offset describes where the image naturally lands relative to the lens; it does not mean the picture can be moved freely. Placing every projector lens at the exact screen center is therefore not a reliable rule.
Lens shift also cannot rescue a projector aimed diagonally across the screen. The projector manual should control any range calculation. ProjectorCentral’s explanation of lens offset and lens shift provides useful technical context for why optical positioning and digital keystone solve different problems.
| Approach | What it changes | Best fit | Watch out for |
|---|---|---|---|
| Physical repositioning | Changes the actual light path | Raw image is strongly distorted or unevenly focused | New position must preserve stability, throw distance, and safe access |
| Optical lens shift | Moves the image through the optics | Projector is level and square but the image lands off-position | Range is model-specific and cannot correct unlimited angles |
| Digital keystone | Reshapes the rendered frame | Raw geometry is already close and needs final trimming | Scaling can soften detail and cannot repair an angled focus plane |
When Repositioning Works Better
Repositioning wins when digital correction is hiding a physical geometry problem rather than cleaning up a small mismatch. A strongly trapezoidal raw image is the clearest sign.
Move the projector when one edge cannot focus with the center, correction is approaching its available limit, or the corrected picture becomes noticeably smaller or softer. A distracting outer light border around the corrected frame provides another warning that too much of the setup is being managed digitally.
Match the move to the failure:
- Move forward or backward when the image size does not fit at the working throw distance.
- Raise or lower the projector when its fixed offset places the picture above or below the screen.
- Rotate the projector body when unequal side edges show that it is not facing the screen squarely.
- Shift sideways only when the new position still allows a direct screen angle or stays within the usable lens-shift range.
Height problems need a stable support, not a tilted projector or a stack of loose objects. Check the projector stand height outside when the lens repeatedly sits too low for the screen.
The move still has to work after dark. Recheck support stability, the beam path, and the cable route before accepting the new position. A cleaner image is not an improvement if guests must step over a cord or pass through the projection beam.
Screen height may be driving the conflict as well. If the projector must aim sharply upward, reconsider how the screen height works with the actual seating before adding more correction. A slightly smaller, physically cleaner image will usually outperform a larger picture held together by extreme keystone.
Square Image Test
The useful test begins with correction turned off. A digitally squared rectangle hides the raw geometry that decides whether the projector should move.
Use this six-point check after the screen and projector reach their actual nighttime positions:
- Stabilize the surfaces. Confirm that the screen is tensioned and square and that the projector support is firm and level.
- Remove digital assistance. Turn off auto-keystone, manual keystone, corner correction, and unnecessary digital zoom.
- Display clear edges. Use a grid or test pattern that reveals the complete outer frame and all four corners.
- Judge the raw shape. Check whether opposite edges are reasonably parallel, then rotate or move the projector if the trapezoid remains obvious.
- Check optical focus. Focus the center and inspect every corner; use documented lens shift before digital correction when available.
- Apply the final trim. Add only the remaining keystone, then inspect subtitles, fine lines, and the outer border from the main viewing seat.
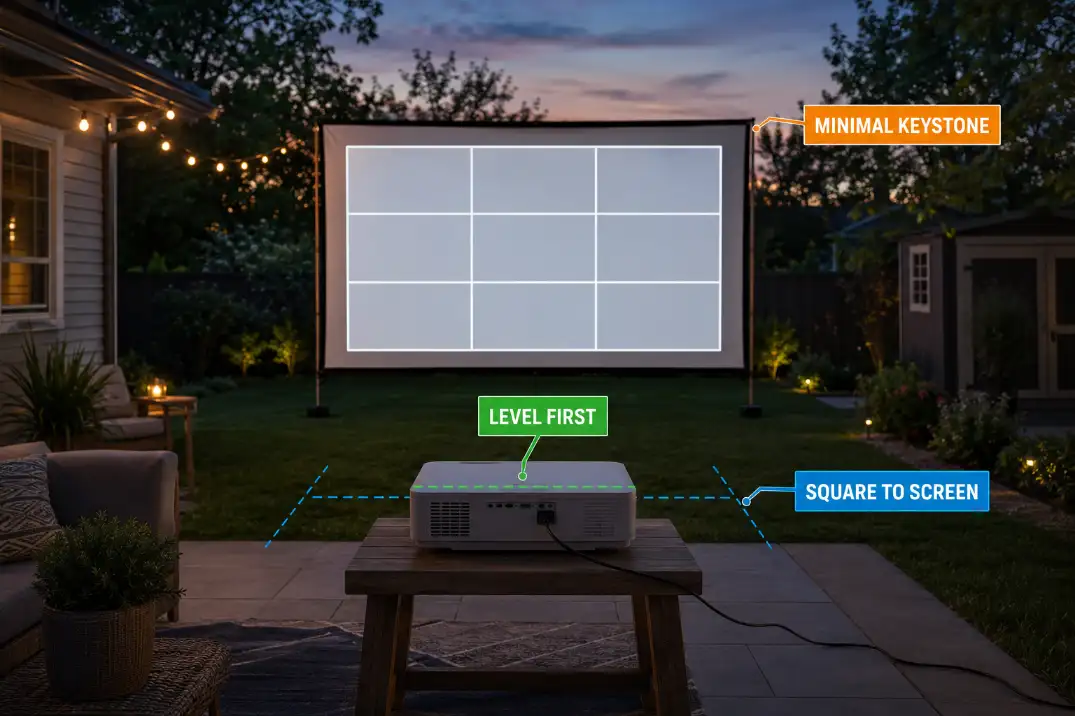
The setup passes when the uncorrected grid is already close to rectangular, the corners focus together, and only modest trimming remains.
The practical hierarchy is geometry first, optical positioning second, and digital correction last.
Break that order only when the patio cost of moving—blocked access, an unsafe cable route, or an unstable stand—is worse than the small visible cost of mild keystone.