Rear projection is worthwhile only when the space behind the screen can function like a small equipment room without walls. It must hold the throw distance, projector body, clear beam, service access, and power route—not merely the projector itself.
That is the part the audience never sees and homeowners often under-measure. Moving the projector behind the screen can clear the seating area and stop guests from crossing a front-projection beam, but it may force the screen several feet away from a fence or property edge.
A rear-compatible screen and a projector with a rear-image orientation setting are basic prerequisites. The real decision is whether the yard has enough usable depth, transmitted brightness, and protected access to support the complete hidden footprint.
Rear projection is therefore a spatial trade, not an automatic picture upgrade. If the rear zone cannot remain dark, stable, and undisturbed, hiding the projector solves the wrong problem.
Space Needed Behind the Screen
The first test is not whether the screen fits. It is whether the projector’s complete operating zone fits behind it.
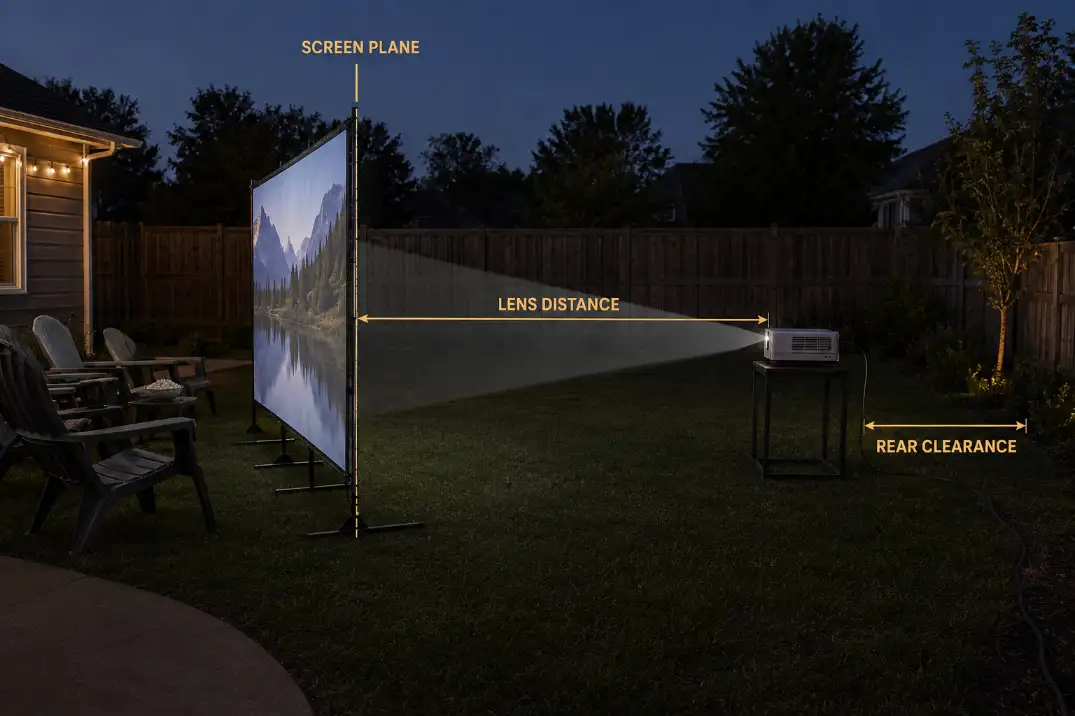
Measure from the projector lens to the screen surface—not from the back of the projector, table edge, or nearest fence. This lens distance depends on the projector’s throw ratio and the width of the intended image:
Image width × throw ratio = approximate lens-to-screen distance
A 100-inch diagonal 16:9 image is approximately 87 inches wide. With a hypothetical 1.2 throw ratio, the lens would need to sit about 104 inches, or 8.7 feet, behind the screen. This is only an illustration; the exact projector specifications and zoom range control the real position.
The same projector throw and placement limits that apply in front projection still exist behind the screen. They are simply less visible from the seats.
Add the Space Around the Projector
Lens distance is only the optical footprint. The physical footprint also includes the projector body, stand or platform, ventilation space, and enough access to level, focus, connect, and retrieve the equipment.
A position can work on a throw calculator and still fail in the yard. A fence directly behind the projector may block its ports. A narrow planting strip may be too soft for a stable stand. A damp corner or slope may add nominal depth without providing usable equipment space.
Short-throw equipment can make a marginal footprint more workable, but it does not remove the need for a compatible screen, stable support, correct alignment, and a protected beam corridor. Verify the actual short-throw placement in a tight backyard at the intended image size before moving the screen.
The correct measurement ends behind the projector, not at its lens. If that complete depth does not fit, rear projection does not fit.
Projector Visibility From the Seating Area
If the projector is physically hidden but its light source remains visible through the screen, the layout has not delivered a clean audience view.
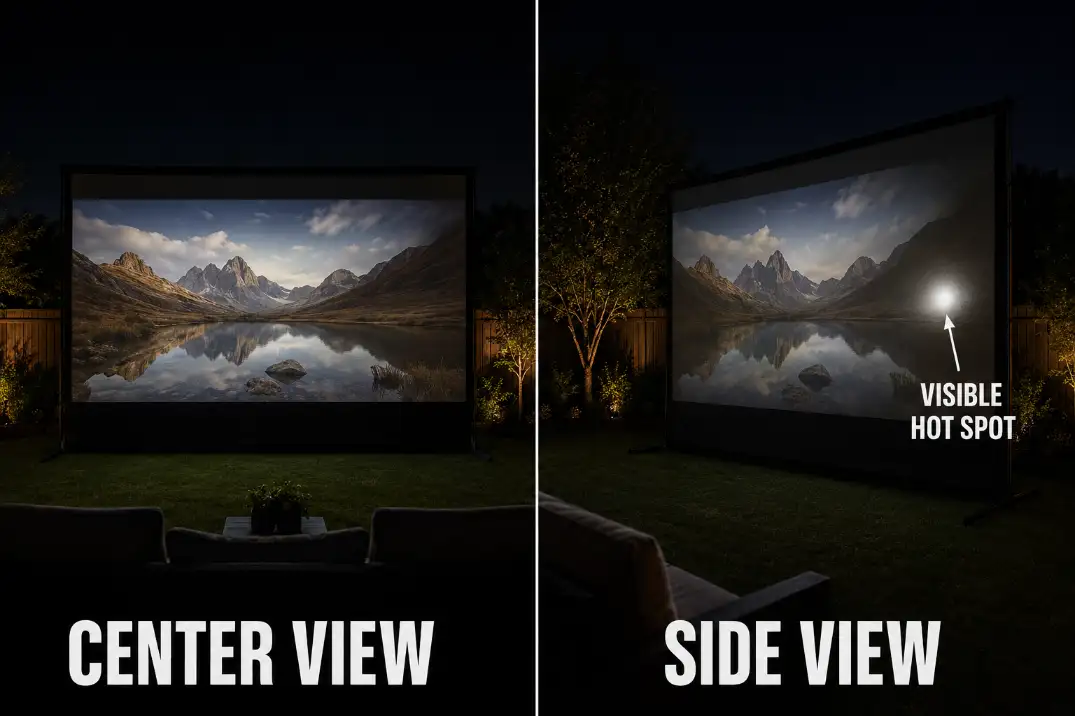
Some rear-projection materials can reveal a concentrated glow where the lens, screen, and viewer align. This hot spot may look restrained from one chair and distracting from another because screen diffusion changes across the seating angle.
The center seat is not enough for the test. Check the picture from the widest intended chairs after full darkness. Look for a bright central patch, fading edges, visible equipment outlines, or a lens glow that becomes more noticeable from one side.
The area behind the screen should also remain dark and visually quiet. Landscape lighting, a pale fence, reflective equipment, or people moving in the rear zone can become faintly visible through some materials.
A low opaque barrier can sometimes hide the stand or equipment below the image area. It should not enter the projected image, restrict ventilation, or make the projector difficult to reach. Concealment that compromises operation is not a useful improvement.
Brightness Loss Through the Screen
Rear projection earns its cleaner audience-side layout by asking projected light to pass through a diffusion layer. Whether that trade works depends more on the real screen-and-yard combination than on a projector’s brightness claim alone.
A standard opaque front-projection screen or black-backed surface may block most transmitted light. A thin household sheet may let light through but still produce weak contrast, visible texture, a bright center, or uneven edges. The material must be designed or explicitly rated for rear projection.
There is no universal brightness-loss percentage that applies to every setup. The result changes with projector output, screen transmission, image size, viewing angle, ambient light on both sides, and the darkness behind the screen. The relevant screen materials for the intended projection method should be judged by their behavior in the intended yard, not by color or thickness alone.
Test the Intended Image Size
Image size is part of the brightness decision. Expanding the picture spreads the available light over more screen area, so a rear-projection image that appears acceptable at 80 inches may look dull or uneven at 120 inches.
Test during the same dusk-to-dark period when movie nights normally begin. Use the intended screen, projector distance, image size, and widest seating positions. Check dark movie scenes as well as bright menus; white graphics can hide weak shadow detail and poor edge uniformity.
Rear projection is not automatically brighter outdoors because the lens sits behind the screen. A clean seating layout is not a gain if the picture requires a later start, smaller image, or noticeably uneven brightness.
Shadows From Behind
Rear projection does not eliminate the no-crossing rule. It moves that rule from the audience area to the space behind the screen.
Guests in front can move without interrupting the beam, but a child reaching the projector, a pet crossing the yard, someone using a gate, or a branch entering the light path can still cast a large visible shadow. Screen supports and stored items create the same failure when they intrude into the projected area.
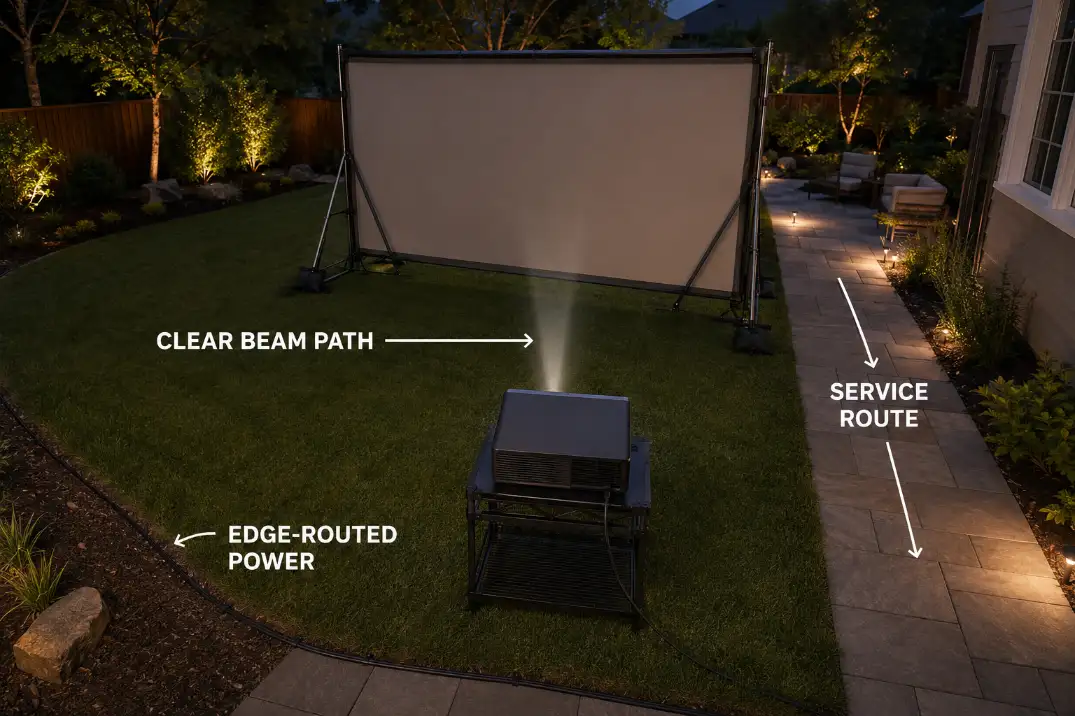
The beam corridor must stay clear for the entire movie. It should not double as the route to a gate, storage shed, side yard, or fence access point.
Someone should also be able to reach the projector without stepping between the lens and screen. The practical arrangement is a narrow service route beside the beam corridor. If every focus adjustment or connection check interrupts the picture, the rear footprint is too compressed.
A screen beside a frequently used gate can look ideal from the audience side while being unworkable behind it. The rear zone must be genuinely inactive, not merely hidden from view.
Power and Cable Position
The power route should be resolved before the screen position is treated as final. Once the projector moves behind the screen, the closest outlet may no longer create the safest path.
In some yards, rear projection moves the equipment closer to a house-side receptacle. In others, it pushes the projector beyond the patio and requires a longer route around the screen. Plan the outlet, perimeter cable path, screen feet or stakes, and projector position as one layout.
Keep the cable outside the beam corridor and away from guy lines, gate swings, wet low spots, and the route used to service the projector. Use outdoor-rated equipment, suitable protected outdoor power, and dry, visible plug connections. A connection does not become safer because the screen hides it.
The strongest route usually follows a wall, fence base, patio edge, or another low-traffic perimeter before approaching the projector from the side or rear. Detailed GFCI protection, extension-cord suitability, connection placement, and load decisions belong in the guide to a safe projector power and cable route.
Leave controlled slack so the cord does not pull against the projector, but avoid loose coils around the stand. A diagonal shortcut through the rear access zone simply relocates the trip conflict that rear projection was supposed to remove.
When Rear Projection Makes Sense
Rear projection makes the strongest case when movement in front of the screen cannot be designed away. It can suit larger gatherings, family movie nights with repeated trips between seats and snacks, or patios where the normal walking route would cross a front-projection beam.
The yard still needs unused depth behind the screen, stable projector support, compatible screen material, adequate darkness, controlled rear access, and a safe perimeter power route. That hidden area must remain functional even though the audience rarely sees it.
Rear projection is a poor fit when the screen must sit against a wall, fence, hedge, or property boundary. A damp low spot, unstable slope, exposed public side, active gate, or frequently used service path can also disqualify the rear zone.
Once the projection orientation is settled, a complete backyard movie setup still has to coordinate the screen, seating, sound, power, and repeatable equipment positions without allowing one component to dictate the entire yard.
| Yard condition | Rear-projection fit | Reason |
|---|---|---|
| Level unused depth with controlled rear access | Strong | The throw zone and service route can remain protected. |
| Tight depth with verified short-throw placement | Conditional | Less lens distance helps, but screen and access limits remain. |
| Screen must sit against a fence, wall, or hedge | Poor | No functional lens and equipment zone remains behind it. |
| Rear area is wet, sloped, public, or an active route | Poor | Equipment support, beam protection, and power routing remain unreliable. |
Short throw can rescue a tight lens distance. It cannot rescue poor screen transmission, unstable ground, uncontrolled movement, or an unsafe power path. When two or more of those conditions fail, front projection is usually the cleaner decision.
Rear projection earns the extra footprint only when the screen, lens distance, equipment clearance, uninterrupted beam, side access, and dry perimeter power route all coexist without special warnings or workarounds. The projector being hidden is the visible benefit; the quality of the hidden zone decides whether that benefit is real.
For model-specific lens distance, confirm the intended image width with ProjectorCentral’s projection calculator.