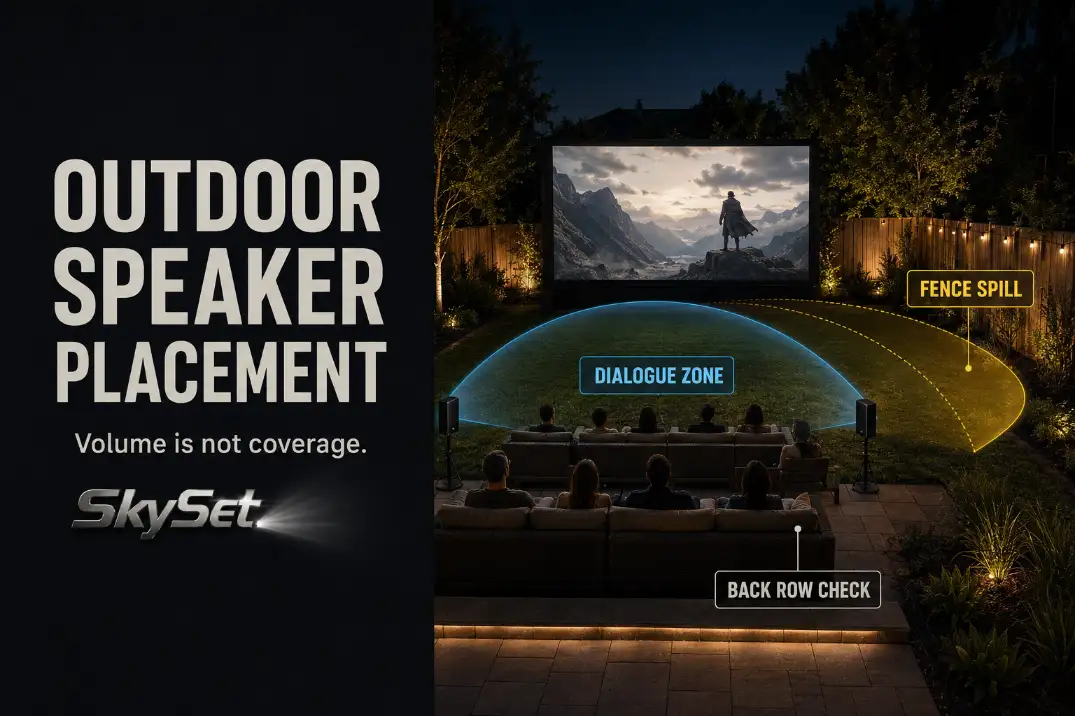
Outdoor speaker placement usually fails before the speaker itself fails. In a backyard theater, the common pattern is not “not enough volume.” It is front seats getting loud first, the back row losing dialogue, and a fence or side boundary receiving cleaner sound than the people watching the movie. That is a coverage problem.
For most backyard theaters, place the main speakers near the screen or front seating edge, aim them inward through the seating zone, and test the last important seat before raising volume.
If the back row needs more volume but the front row becomes harsh within 30 seconds, the speaker is probably aimed or positioned wrong.
Outdoors, there are no room walls to help carry sound, so a 4–8 ft placement change can matter more than another volume notch.
Quick answer: The best outdoor speaker placement for most backyard theaters is near the screen or front seating edge, roughly 6–10 ft apart for compact setups, 3–5 ft off the ground when possible, and aimed inward through the seating area. The final test is not whether the front row sounds loud. It is whether normal dialogue stays understandable from the back row without blasting the front row or the fence line.
Front Speakers
Start with the screen, not the projector table
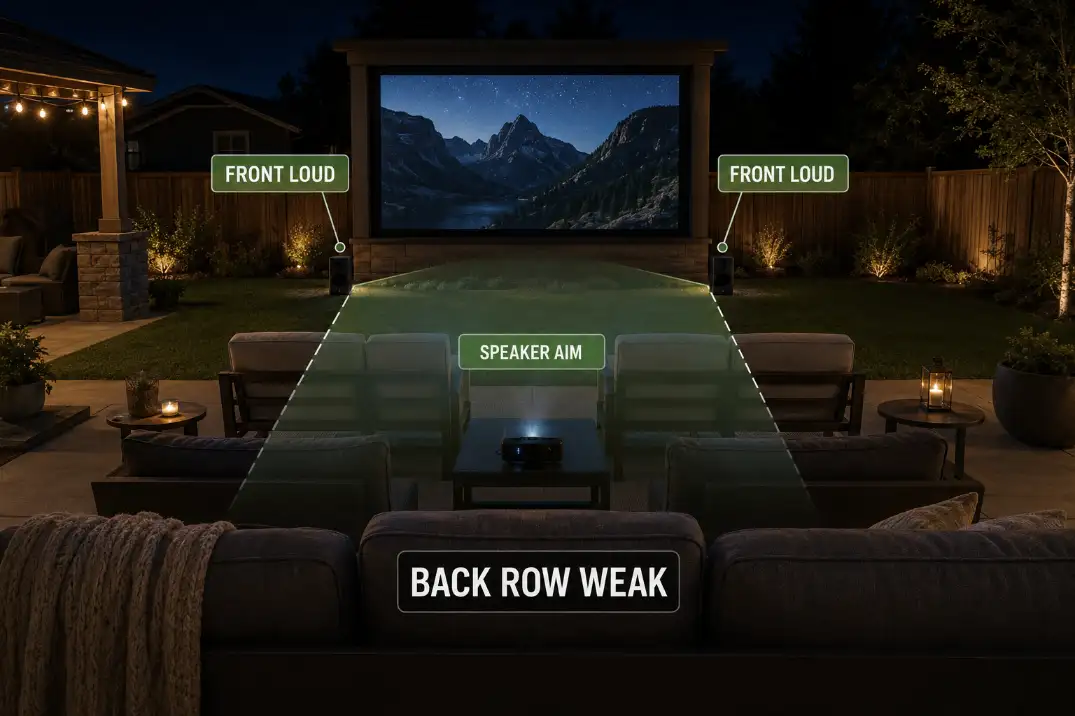
The main front speakers should sit near the screen or front seating edge because that is where the movie sound is expected to come from.
When the speaker sits beside the projector table behind the audience, dialogue can feel disconnected from the picture. People may still hear the sound, but their ears are being pulled away from the screen.
For many casual backyard theater layouts, two front speakers placed roughly 6–10 ft apart near the screen work better than one loud speaker behind the seats.
The exact spacing depends on screen width and seating width, but the rule is simple: the speakers should cover the people, not decorate the edges of the yard.
Speaker height also matters. A practical target is around seated ear height, often about 3–5 ft above the ground.
Speakers placed directly on the lawn can lose clarity into chair backs, bodies, grass, and patio furniture. Speakers mounted too high without downward aim can send the clearest sound over the audience instead of through it.
If the issue is weak outdoor dialogue, the first fix is not always a bigger speaker. The placement logic behind Why Backyard Movie Sound Feels Weak Outdoors matters because a louder speaker can still miss the seating zone.
Aim through the seats before raising volume
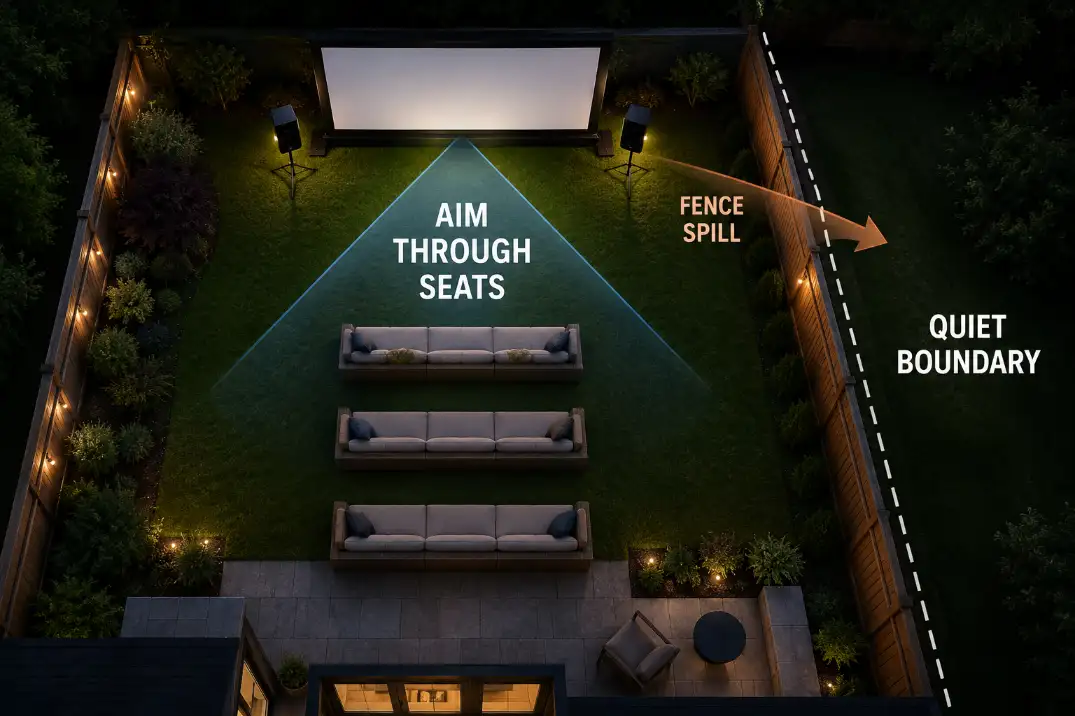
A speaker pointed straight across the yard may look tidy, but it can send the strongest part of the sound beside the audience or into a fence.
Rotate the speakers slightly inward so the sound paths cross through the main seating area. The center seats should hear dialogue clearly without making the nearest seats flinch during louder scenes.
The wasted fix is buying more power before correcting aim. If the front row is already too loud and the back row still misses speech, volume is no longer the main lever. The sound is not being distributed well.
Setup Note: Use normal dialogue for the first adjustment, not music or action scenes. Explosions can hide the speech problem you are trying to fix.
Side Speakers
Side speakers are useful when the seating area is wide, deep, or uneven. They are not automatically better for every backyard movie night.
In a small family setup, two well-aimed front speakers often beat four poorly placed speakers because the dialogue stays anchored to the screen.
Side speakers should support the seating zone, not become the main voice of the movie. If people turn toward a side speaker during dialogue, that speaker is too dominant or too close. The movie should still feel like it is coming from the screen area.
Treat side speakers as fill, not a second front stage
The best side-speaker placement usually sends sound across the audience at a controlled level. It should not blast down the fence line, into a neighbor-side boundary, or straight at one row.
Side speakers placed too far behind the last row can make rear seats louder but less natural, especially when speech seems to come from behind the viewer.
For compact patios, side fill often works better near the front half or middle third of the seating area than behind everyone.
Keep the volume lower than the front speakers. The side speaker should make the seating zone feel more even, not announce itself.
Seating Zone
Design around the last important seat
Speaker placement should be planned around the last seat that must hear dialogue clearly. That may be the back row, a sectional corner, a pair of folding chairs on the lawn, or the far side of a patio. If people will actually sit there, it is not a bonus area. It is the test seat.
A common backyard movie seating distance is roughly 10–18 ft from the screen, depending on screen size and yard layout. Sound can still work beyond that range, but the deeper the seating zone gets, the more carefully you need to aim and support it.
In open air, sound level can drop by about 6 dB each time the distance from the speaker doubles. A chair 20 ft from the speaker is not hearing the same thing as a chair 10 ft away.
This is why the back row often reveals the real problem. The front row may sound powerful while the back row loses consonants, quiet speech, and soft dialogue. That is not a cosmetic issue. It is the seating zone falling outside the useful sound path.
A complete Backyard Movie Night Setup should solve screen position, walking lanes, power, and speaker coverage together. If the seating zone shifts after the sound test, the speaker placement may need to shift too.
Use the front row as a warning, not the target
The front row is not the place to judge success. It is the place to detect harshness. If the front row sounds sharp, boomy, or uncomfortable while the back row still wants more volume, the layout is failing from both ends.
| Placement Check | Healthy Condition | Failing Condition | First Fix |
|---|---|---|---|
| Front row | Clear but not harsh | Loud first, sharp first | Reduce level after re-aiming |
| Middle seats | Dialogue feels centered | Sound pulls to one side | Adjust left/right aim |
| Back row | Speech stays understandable | Quiet voices disappear | Move or add coverage |
| Fence side | Sound stays in seating zone | One boundary sounds louder | Rotate speaker inward |
| Volume setting | One level works for most seats | Front row suffers for back row | Fix placement before power |
Fence Reflection
A fence is not a sound fix
A tall fence can make a backyard feel more private, but it does not automatically keep movie sound contained. Hard boundaries such as wood fencing, vinyl fencing, stucco walls, garage walls, and the side of a house can reflect or redirect sound.
Sometimes the result is not a clear echo. It is muddy dialogue, a louder side yard, or one seating area that sounds messy while another sounds normal.
The symptom is “the audio sounds unclear.” The mechanism may be sound energy hitting a hard surface instead of passing cleanly through the seats. If a speaker points toward a fence only a few feet away, that fence becomes part of the sound path.
This is one condition readers often underestimate. The fence may block the view, but it can still bounce or carry sound in a way that makes the speaker seem worse than it is. A taller fence is not a speaker placement fix.
Pull sound away from the boundary
The better move is usually small: rotate the speaker inward, move it slightly away from the fence, or reduce volume after the aim improves. If the cleanest sound path crosses the audience first, you usually need less volume overall.
This also helps with neighbor-side spill. You may not be able to make a backyard theater silent outside your property, but you can avoid aiming the strongest sound directly at the boundary.
That is the difference between using enough sound for the audience and accidentally using the fence as a target.
Cable Routes
Route cables around the activity zone
Speaker placement is not finished if the cable route cuts through the walking path. The safest route is rarely the shortest route. A direct cord from outlet to speaker may look efficient at 6 p.m., then become a trip hazard after dark when people carry food, drinks, chairs, or blankets.
Run speaker cables and power cords along a fence edge, patio edge, wall line, or behind the seating area when possible. If a cable must cross a walkway, use a visible outdoor-rated cord cover and keep it out of the main traffic path. Outdoor-rated cords and GFCI-protected outlets matter more than a clean-looking shortcut.
The practical problem is not only safety. Bad cable routing often forces people to move the speaker after the sound test. Once the speaker moves, the dialogue zone changes. A system that sounded balanced during setup can become weak by the time the movie starts.
Do not let cable convenience choose the speaker position
The outlet should not decide where the audience hears the movie from. If the only easy cable route places the speaker beside the projector, across a walking lane, or directly against the fence, solve the route instead of accepting the bad placement.
This is where sound placement overlaps with broader Backyard Movie Setup Mistakes. A layout can look ready in daylight and still fail after dark because the cords, chairs, lights, and speaker angles compete for the same space.
Sound Test
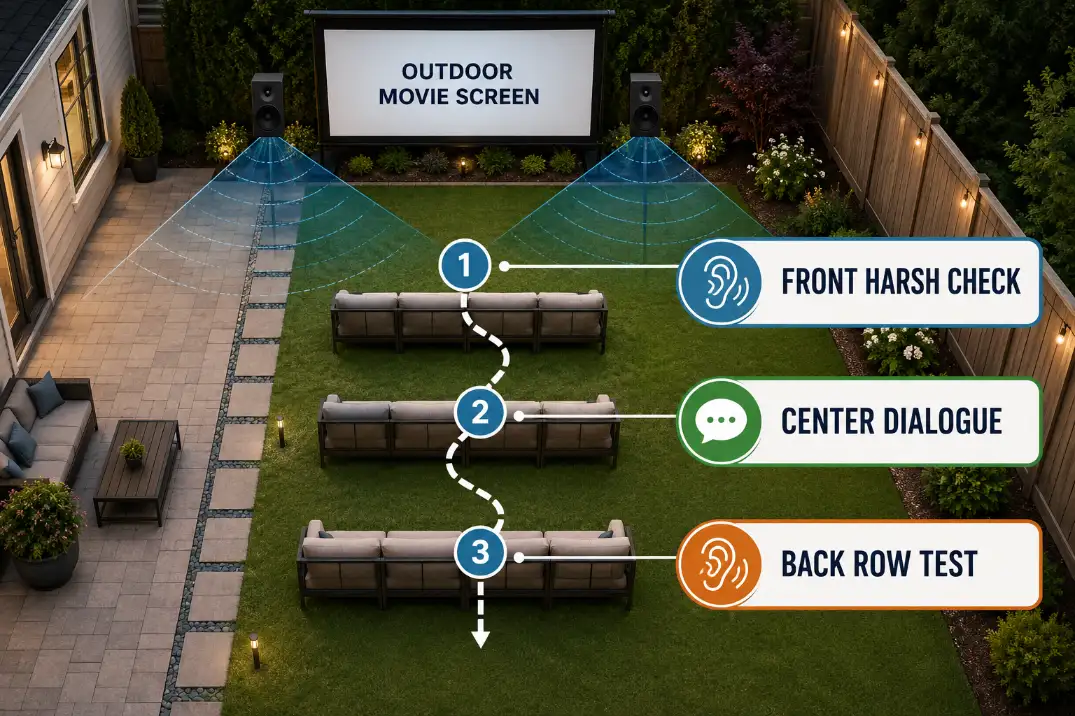
Test with speech, not spectacle
The best sound test is a 30- to 60-second dialogue scene with normal speaking voices. Action scenes are poor test material because explosions, music, and effects hide the exact problem you need to hear.
If quiet speech works, loud scenes usually take care of themselves. If quiet speech fails, volume alone will not make the system feel balanced.
Use a simple three-position test. First, sit in the front row and check whether dialogue is clear without being sharp. Second, stand or sit near the center of the seating zone and listen for whether voices feel anchored to the screen. Third, move to the last important seat and check whether normal speech is still understandable.
If the back row fails, adjust speaker aim before raising volume. If aim helps but the seating zone is more than about 18–20 ft deep, or if background noise from traffic, pool pumps, HVAC equipment, or neighboring patios is constant, two front speakers may no longer be enough.
That is when side fill, a stronger front pair, or a different seating layout starts to make more sense than another volume increase.
Run the final check after the yard is set
Do the final sound test 15–20 minutes before the movie starts, after the screen, projector, chairs, path lights, snack table, and cable routes are already in place.
Testing too early can mislead you because the yard changes once people arrive. Bodies absorb sound, chairs block sound paths, side conversations add noise, and someone may move a speaker to clear a walkway.
Bluetooth or wireless speakers need one extra check: lip sync. If dialogue arrives more than about 100–150 milliseconds late, the sound can feel detached from mouth movement. Some projectors and streaming devices let you adjust audio delay, but that only fixes timing. It does not fix weak coverage.
The stopping point is simple. Normal dialogue should be understandable from the back row, the front row should not feel punished, and the speaker path should not aim into the fence. Once those three conditions are true, stop chasing volume.
Outdoor theater sound gets better when the sound goes to the right place, not when the whole yard gets louder.
For broader official guidance on loud sound exposure, see the CDC NIOSH noise exposure guidance.