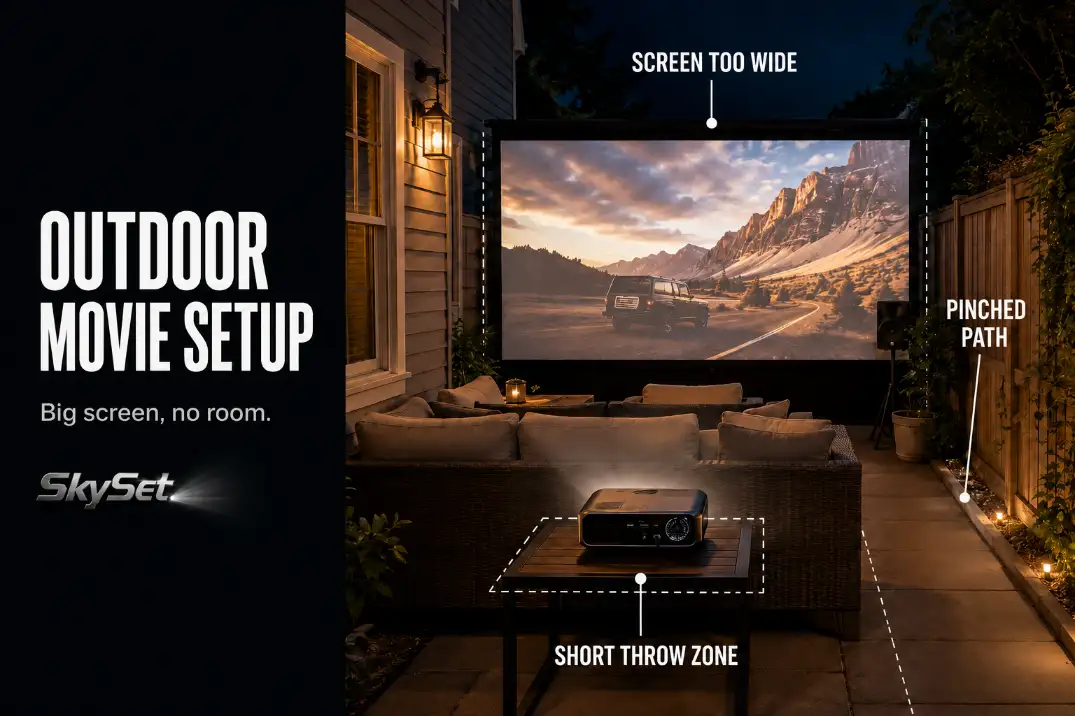
A good outdoor movie setup for small patios is not built by choosing the biggest screen that will physically stand up.
It works only when the screen width, seating distance, projector throw, walking path, sound direction, and cable route all fit at the same time. If one part steals too much room, the patio feels crowded before the movie even begins.
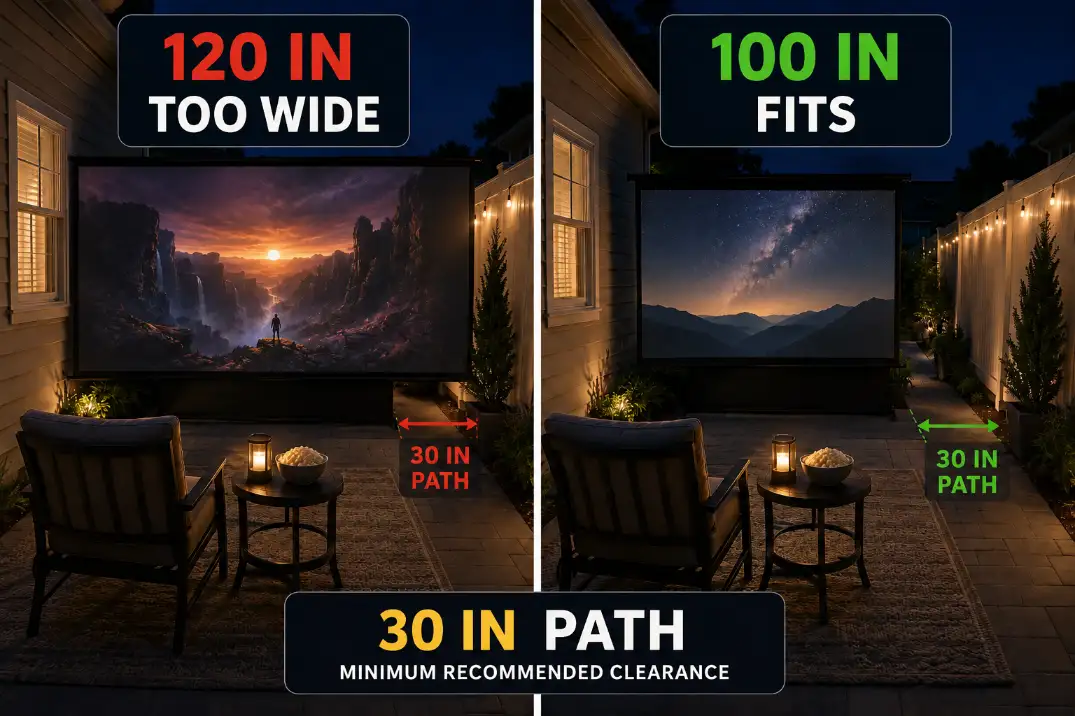
Start with the hard limits. Keep the main walking path close to 30 inches clear after chairs are occupied. Treat 80 to 100 inches as the safer screen range for many tight patios.
Be careful with 120 inches if the main seats are under about 8 feet away. And if teardown takes more than 30 minutes, the setup is probably too complicated for regular use.
This is different from a larger backyard movie setup. In a yard, you can move the projector, chairs, speakers, and cables apart. On an 8- to 12-foot-deep patio, the layout has to be edited harder.
Screen Size Limits
Start with screen width, not diagonal size
The screen diagonal gets the attention, but the width is what crowds a compact patio. A 100-inch 16:9 screen is roughly 87 inches wide. A 120-inch 16:9 screen is roughly 105 inches wide. That extra foot and a half can erase the side path.
The scene is common: the screen looks exciting while the patio is empty, then chairs, a side table, speaker, and projector go in.
Suddenly the setup feels like a display booth instead of a place to sit. That is not a projector quality problem. It is a space allocation problem.
For many small patios, the better decision is an 80- to 100-inch image with comfortable viewing distance. A smaller screen that leaves a clean access line usually beats a larger screen that forces people to step over legs, cables, or table corners.
When 120 inches stops making sense
A 120-inch screen can work only when the patio has enough depth and width to support it. If the main seats are closer than about 8 feet, the image can feel too large, especially for subtitles, sports, or fast camera movement.
The overestimated condition is screen impact. People assume bigger always feels more cinematic. The underestimated condition is clearance.
Once the screen blocks a sliding door, grill path, storage bench, or normal walking line, the setup has already lost.
If the picture still looks dim after reducing screen size, then brightness may need attention. But solve physical fit first.
A brighter projector will not fix a screen that is too wide for the patio. For image output decisions after the layout is realistic, use How Bright Should an Outdoor Projector Be? as the next check.
Short Throw Needs
Throw ratio decides whether the projector belongs there
Small patios punish standard projector placement. The important number is not just projector brightness. It is throw ratio.
Projector distance depends on screen width. A 100-inch 16:9 screen is about 87 inches wide. With a 0.5 throw ratio, the projector may sit about 44 inches from the screen.
With a 1.2 throw ratio, that same image may need about 8.7 feet of distance. On a tight patio, that difference decides whether the projector table sits inside the movie zone or blocks the route.
This is why short throw placement often matters more than an image upgrade. A standard projector can force the table behind the chairs, in front of a door, or across the only clean path.
A short throw projector can keep the table closer to the screen and out of traffic.
Keystone correction is not a layout fix
One wasted fix is relying on keystone correction to solve bad placement. Keystone can straighten the image, but it does not move the projector out of the doorway. It also cannot restore a path blocked by a table.
Ultra-short throw projectors sound ideal for small spaces, but they are not always the easiest outdoor choice. They need a very flat screen, stable surface, and careful alignment.
A small bump on the table can distort the image quickly. For many patios, a normal short throw projector on a stable low table is the better balance.
Setup Note: If the projector table has to sit in a doorway, step zone, or food path, the projector is in the wrong place even if the image looks sharp.
Compact Seating
Keep the best seats, not the most seats
Small patios do not reward maximum chair count. Four comfortable seats usually beat six cramped seats. The real footprint is not the chair when folded or empty.
It is the chair when someone is sitting in it, with legs extended, a drink nearby, and someone else trying to walk behind.
A basic folding chair can need about 30 inches of occupied depth. A deeper lounge chair may need 36 to 42 inches. Add a cooler, snack table, or small ottoman and the access line can disappear fast.
The best default is one primary row facing the screen, plus one flexible side chair if needed. On a narrow patio, perimeter seating can work better than floating every chair in the center.
On a squarer patio, a shallow L-shape can keep people aimed toward the screen while preserving a side route.
The mini-theater layout is usually the wrong model
A full backyard theater layout sounds logical: screen, centered seating rows, rear projector, speaker stands, table, and aisle. In a restricted space, that layout can become too rigid. The parts are individually reasonable, but together they leave no breathing room.
The better priority order is screen first, main seats second, walking path third, accessories last. A large coffee table is usually less useful than two movable side tables.
A snack station should sit outside the main path, not in the center like a living room table.
If the patio already feels tight in daylight, it will feel worse after dark. That is where many setups resemble the avoidable layout problems in Backyard Movie Setup Mistakes: everything is technically present, but the space no longer works.
Side Sound
Side speakers can work when they stay aimed
Small patios rarely have perfect front speaker positions. Side sound is acceptable when the speakers are aimed through the seating area instead of across the patio or toward the fence.
Try to keep small speakers around seated ear height, often about 36 to 44 inches from the ground. If one speaker sits close to one chair and far from the others, dialogue can feel lopsided even at modest volume.
The symptom is “weak sound,” but the mechanism is often short-distance imbalance, not weak equipment.
A quick test is more useful than guessing. Play normal dialogue for 2 minutes. Sit in the nearest chair, then the farthest chair, then stand near the patio edge. If the patio edge sounds louder than the seats, the speakers are aimed wrong.
More volume usually makes the problem worse
The common wasted fix is turning everything up. On a small patio, more volume can make the closest chair harsh while the farthest chair still misses dialogue. It can also push sound toward the neighbor side sooner than expected.
Aim is the better first fix. Point the speakers through the seating zone, reduce extreme side angles, and avoid placing one speaker directly beside someone’s ear.
If dialogue still feels uneven after that, the deeper issue may be speaker placement rather than power. For that next layer, Outdoor Speaker Placement for Backyard Theater is the more useful guide.
Cable Route
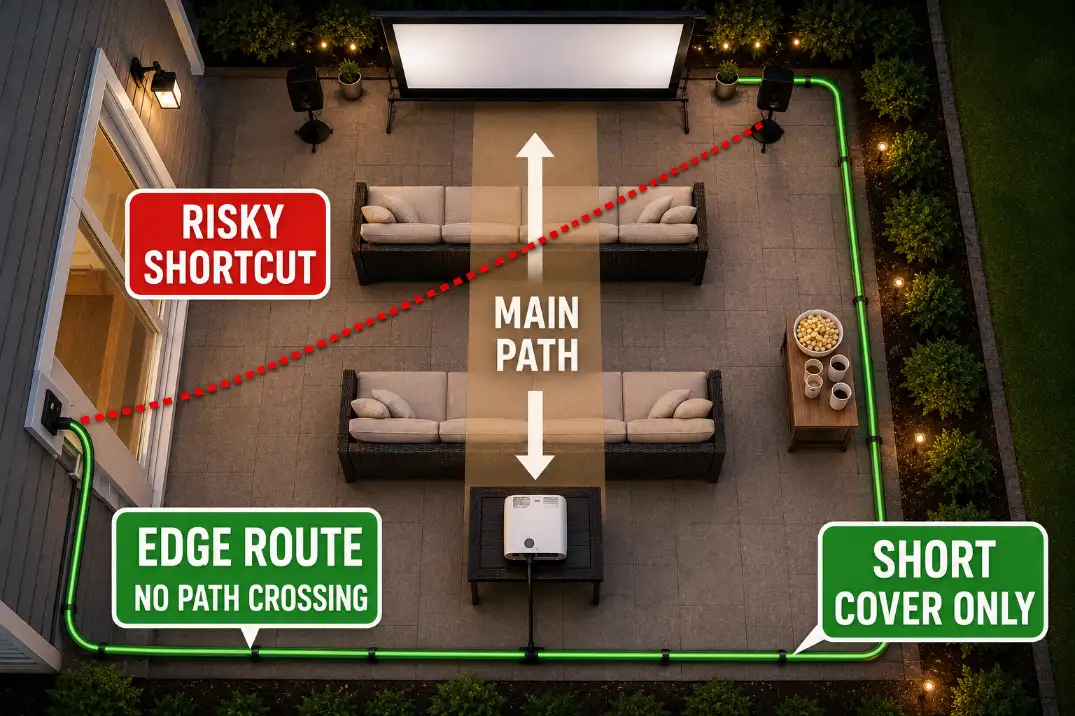
The edge route is boring because it works
Cable routing becomes more important on small patios because people have fewer alternate paths. A cord that might be acceptable along a wide lawn can become the main trip line across a 9-foot patio.
The safer default is an edge route. Run power and signal cables along the wall, fence edge, or patio border whenever possible.
Cross the walking path only when there is no cleaner option, and keep the crossing short, visible, and covered. A 2-foot covered crossing is very different from a 10-foot diagonal cord cutting across the patio.
Door thresholds matter too. A sliding door route that looks harmless during setup can become annoying once people carry food, blankets, or drinks outside. If the cable crosses the same path people use all night, change the layout before adding more gear.
For the trip-risk side of this problem, Backyard Projector Power Setup Without Cable Hazards is the better supporting guide.
Weather protection still matters on a patio
A patio can feel protected without actually protecting every connection. Moisture collects near slab edges, low corners, damp grass, sprinkler spray, and places where people set drinks. A plug connection sitting low near the patio edge is weaker than a raised, visible connection.
Keep outdoor connections off the ground, away from low wet spots, and out of foot traffic. In humid places like Florida or coastal California, moisture can remain on surfaces long after sunset. In dry regions, dust and foot movement may be the bigger problem, but the practical rule stays the same: visible, raised, and away from the walking route.
If damp connections are the weak point in your setup, Weatherproof Cable Management for Outdoor AV covers the cable protection side more directly.
Storage Plan
Teardown time predicts whether the setup survives
Storage is not separate from the outdoor movie setup. On a small patio, the best layout is often the one people can put away correctly after the movie.
A practical target is a 10- to 15-minute pack-down. That usually means one cable bin, one projector case, one screen storage spot, and no layout that requires moving heavy furniture twice.
Once teardown reaches 30 minutes or more, people start leaving cables loosely coiled, screens leaning in damp corners, or speakers outside longer than intended.
This is where a routine fix stops making sense. More stands, bigger speakers, larger screens, and extra tables may improve the first night on paper, but they can make the setup too annoying to repeat.
Fixed is not automatically better
For occasional use, a compact portable setup is usually the better choice. For weekly use, a pull-down or semi-permanent screen may be worth considering. But fixed equipment only helps if it preserves the patio’s normal function.
A mounted screen that blocks a door, catches wind, reflects a porch light, or forces seats too close is not an upgrade.
It solves storage while damaging the movie experience. In tight layouts, permanent mistakes are easier to notice because there is no spare space to absorb them.
Screen glare and nearby house light are also worth checking before anything becomes fixed. If a porch light, window glow, or string light washes the image, the screen location may be wrong even if the screen itself fits.
For most small patios, the safest setup is a 90- to 100-inch screen, short throw projector placement, one main seating row, side-aimed speakers, and an edge cable route that keeps about 30 inches of walking clearance.
Small Patio Setup Check
| Check | Better Condition | Problem Condition |
|---|---|---|
| Screen size | 80–100 inches for many tight patios | 120 inches with seats under about 8 feet away |
| Screen width | Leaves side clearance and door access | Blocks path, grill, door, or storage bench |
| Walking path | About 30 inches clear after chairs are occupied | People squeeze behind seats or step over cords |
| Projector throw | Short throw table stays out of traffic | Standard throw forces table into aisle or doorway |
| Speaker aim | Dialogue aimed through seats | Sound is louder at fence or patio edge |
| Cable route | Edge route with short covered crossing only | Long diagonal cord across the main path |
| Teardown | 10–15 minutes with one storage zone | 30+ minutes and pieces left outside |
Questions People Usually Ask
Can a small patio use a 120-inch screen?
Sometimes, but it should not be the default. If the main seats are less than about 8 feet away or the screen width kills the side path, 120 inches is likely too aggressive. A 90- to 100-inch image often feels better because the whole patio still works.
Is short throw required for a small patio?
Not always, but it is often the cleanest solution. If a standard projector forces the table behind chairs, across a doorway, or into the walking path, short throw placement matters more than extra brightness.
What should be set up first?
Set the screen and main seats first. Then place the projector, then speakers, then cables. If you start with accessories, you may build around the wrong constraint and only notice the crowding after everything is connected.
The best outdoor movie setup for a small patio is not a smaller copy of a full backyard theater. It is a tighter system where every part earns its space.
Once the walking path disappears, the setup has already failed. Once the projector blocks movement, the image is not worth the tradeoff.
A slightly smaller screen, cleaner short throw position, better speaker aim, and safer edge cable route will usually outperform a larger setup that only looks impressive before anyone sits down.
For broader official guidance on outdoor extension cord and GFCI safety, see the U.S. Consumer Product Safety Commission outdoor repairs checklist.