Small patio projector placement problems usually start with geometry, not brightness. Before blaming the projector, check whether it can physically create the screen size from the patio depth you actually have.
On a 10-by-12-foot patio, a projector may need 8 to 11 feet from lens to screen for a 100-inch image, but chairs, a door swing, a side table, and a 30-inch walking route can quickly take that space away.
A weak outdoor image and a badly placed projector can look similar at first. A brightness problem makes the whole picture hard to see.
A placement problem shows up as skewed corners, uneven focus, a beam crossing the chairs, or keystone correction that has to work hard every time.
Test the setup at the real viewing time, at least 20 minutes after sunset, and start with a 90- to 100-inch image before forcing 120 inches into a tight patio.
Quick placement rule
If the projector cannot reach its needed lens-to-screen distance while keeping chairs and a 30-inch path clear, reduce the image size before changing projector settings.
If the patio depth is under about 8 feet and you still want a large image, standard throw is probably the wrong projector type.
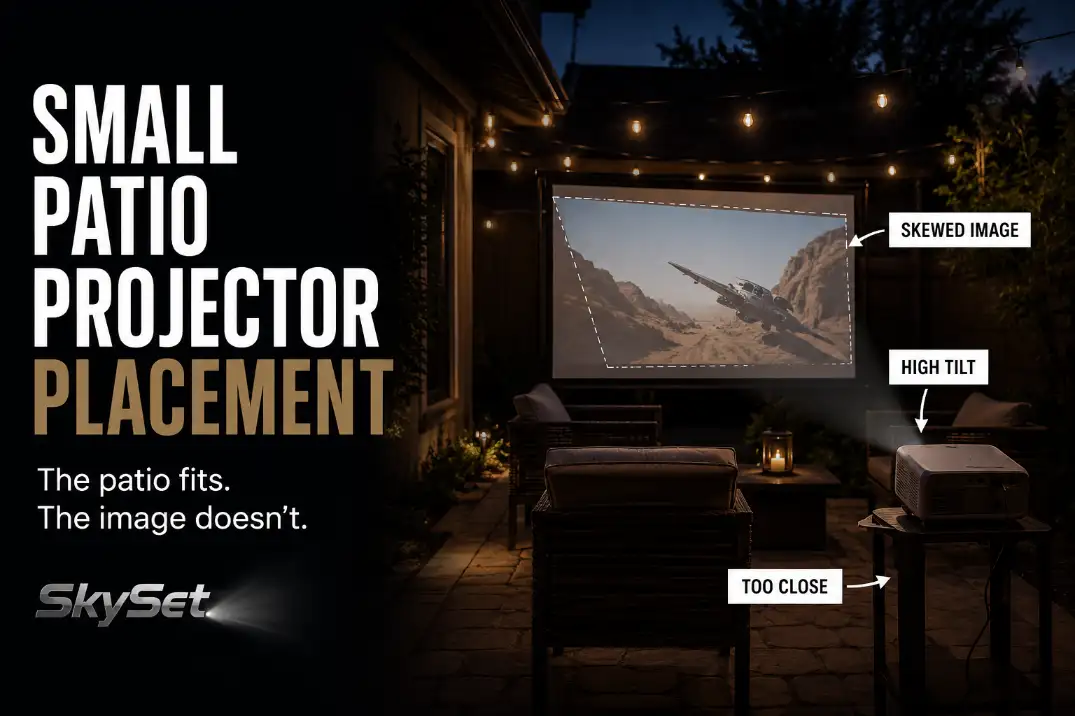
Too Close
The screen size has to fit the throw, not just the wall
The first hard limit is throw distance. That means the distance from the projector lens to the screen surface, not from the back wall, chair line, or table edge.
A patio can look deep enough until the projector body, cable bend, walking route, and seating clearance remove 2 or 3 usable feet.
A simple throw fit test helps. A 100-inch 16:9 image is about 87 inches wide, or roughly 7.25 feet. If your projector has a 1.2:1 throw ratio, it needs about 8.7 feet from lens to screen.
At 1.5:1, it needs about 10.9 feet. If your patio cannot give that distance without putting the projector inside the chair zone or walkway, the image size is too large for that layout.
On a small patio, the screen size is not chosen by what fits on the wall. It is chosen by what the projector can hit while still leaving chairs, beam clearance, and a usable path.

The common wrong fix is buying brightness
A brighter projector can help if patio lights, porch lights, or nearby windows are washing out the image. It will not fix a projector that is too close, too angled, or aimed across the seating area.
If the image is trapezoid-shaped before correction, brightness is not the main issue.
This is where small patio setup often gets misread. The user sees a disappointing image and assumes the projector is underpowered.
But if the picture sharpens in the center while the corners stretch or blur, the layout is failing before brightness even matters.
If the whole setup feels cramped, treat this as part of the patio layout problem, not just a projector problem. The same screen-size and clearance decisions are covered more broadly in Outdoor Movie Setup for Small Patios.
Too High
A safe table can still be the wrong stand
A projector can sit safely on furniture and still be too high for the image. The important point is lens height, not table height. If the screen bottom sits about 24 to 30 inches above the patio, a low table or compact stand may work.
A 40- to 42-inch bar-height table often forces the projector to aim downward, which creates vertical distortion.
This setup usually looks reasonable before the movie starts. The projector is stable, the screen is visible, and autofocus may appear to work.
Then the center of the image looks acceptable while the top or bottom stays slightly soft. That softness is the symptom. The underlying mechanism is lens tilt.
If the projector has to point noticeably down at the screen, the table is not acting as a proper stand. It is creating the distortion.
Shims stop making sense quickly
A 1-inch adjustment under the front or back of the projector can help fine-tune alignment. Stacking books, boxes, folded towels, or random patio objects usually means the stand height is wrong.
Once the projector needs several inches of tilt correction, the setup becomes unstable and hard to repeat the next night.
The better fix is to lower the projector, adjust the screen height, or use a stand that lets the lens sit closer to the screen’s vertical target area. Digital tools should clean up a nearly correct setup. They should not be doing the main physical work.
Layout Check: Set the projector on a stable surface, turn keystone off, and judge the raw image first. If the uncorrected rectangle is badly distorted, fix height and alignment before touching settings.
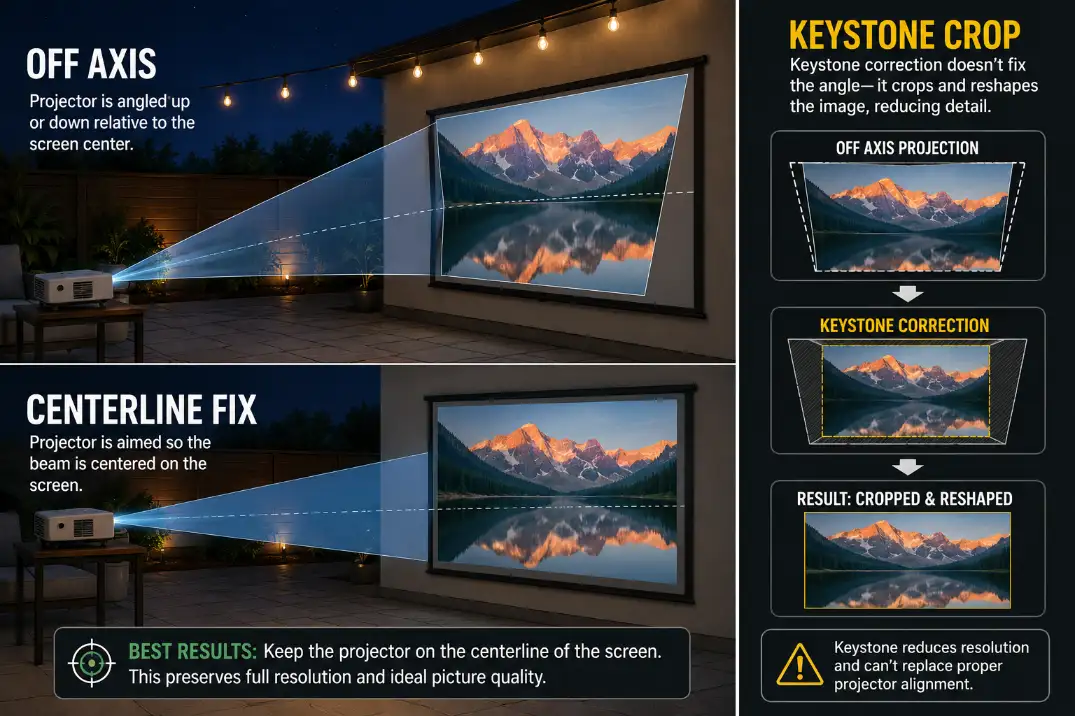
Wall Angle
A flat wall can still be the wrong wall
A patio wall, garage door, fence panel, or stucco surface may look like an easy screen. But the projector also needs to face it squarely. If the wall is even 5 to 10 degrees off the seating axis, one side of the image may look wider than the other.
This is different from a bad screen surface. A rough wall creates texture, shadows, or sparkle. An angled wall creates geometry distortion.
A brightness problem makes the whole picture harder to see. A wall-angle problem changes the shape and focus of the picture.
That distinction matters because the fixes are different. Refocusing will not square an angled wall. More lumens will not repair skewed corners.
The useful fix is to move the projector onto the screen centerline or use a freestanding screen that can face the seating area directly.
Chair angle can expose the wall mistake
People often overestimate how much usable wall they have and underestimate how much chair angle affects comfort.
If viewers have to turn their heads more than about 15 degrees for a 2-hour movie, the setup may feel awkward even when the image is technically watchable.
A screen that is square to the projector but not square to the seating is still a weak layout. The best position is the one where the projector, screen, and main chairs share the same axis.
In a small patio, that may mean using a slightly smaller screen instead of stretching across the widest wall.
| Visible problem | More likely mechanism | Better fix |
|---|---|---|
| Image wider on one side | Projector is off-axis to the wall | Move projector to centerline |
| Top edge narrower than bottom | Projector is tilted up or down | Correct lens height first |
| One corner never sharpens | Lens is angled across the screen | Square the projector before focusing |
| Whole image looks faint | Ambient light or weak brightness | Check light control and projector output |
| Viewers turn their heads | Screen does not face seating | Recenter screen or chairs |
| Projector blocks the path | Throw distance is too long | Reduce screen size or use short throw |
Keystone Limits
Keystone correction hides the placement error
Keystone correction is useful for small cleanup. It is not a replacement for a square projector position. Digital keystone reshapes the image by cropping and rescaling it, which can reduce apparent sharpness.
On a small patio, viewers are close enough to notice soft subtitles, uneven menu text, or stretched edges.
A few degrees of correction is normal. Needing 10 to 15 degrees every time is a warning sign. At that point, the better move is usually to change the physical setup before adjusting the digital controls again.
If the image is square and focused but still looks weak after dark, then brightness and ambient light become the next problem to check.
That is a different failure pattern from placement and is handled more directly in How Bright Should an Outdoor Projector Be?.
Lens shift is not the same as keystone
Lens shift and keystone are often treated as if they do the same job. They do not. Lens shift moves the image optically within the projector’s design range. Keystone digitally reshapes the image after the projector is already off angle.
If your projector has lens shift, use it before keystone for small alignment corrections. Many compact portable projectors have limited lens shift or none at all, which makes physical placement more important.
In that case, centerline position, lens height, and screen angle matter more than any automatic correction feature.
Chair Position
A setup can test well and fail once people sit down
A projector can be centered, focused, and still placed badly because a patio has to function during the movie. People need to sit, stand, pass behind chairs, reach drinks, and avoid cables. A setup that works during a 5-minute test can fail during a 2-hour movie.
For a 90- to 100-inch image, a first-row viewing distance of about 7 to 10 feet usually feels more natural than sitting 5 or 6 feet away. A 120-inch image often wants more seating depth than a small patio can give.
When the image gets too large, the problem may not sound like “projector placement.” It may show up as people leaning back, turning their heads, or stepping around the projector all night.
People stepping over the cord is not just a cable issue. It is a layout issue. Once the projector line forces the power route through the main path, the placement has already failed.
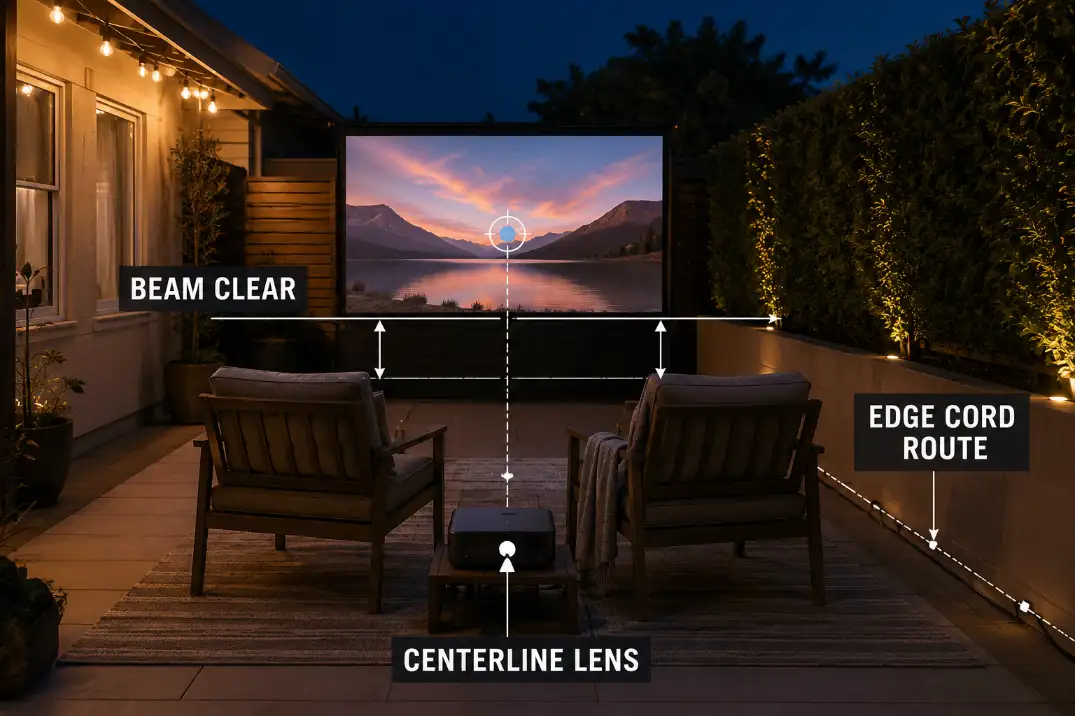
Beam clearance belongs in the first layout test
Chair backs, side tables, snack carts, and people standing up can all cut through the beam. This is more common with low projector placement in front of seating and high screen placement at the patio edge.
The projector may look aligned until someone sits down and blocks the lower part of the image.
Leave at least a 30-inch clear walking route where people naturally move. More is better, but below that number the patio starts to feel squeezed once blankets, drinks, pets, or kids are involved.
If the projector or cord sits inside that route, the technical setup may work, but the patio does not.
When picture placement starts forcing awkward speaker positions near corners or behind chairs, check the audio separately after the image line is solved.
Outdoor Speaker Placement for Backyard Theater is the better next step once the projector centerline is no longer fighting the seating.
Better Layout
Use the 10-minute dry run before movie night
The strongest small patio setup is not the one with the largest possible screen. It is the one that repeats cleanly. A 10-minute dry run can catch most projector placement problems before guests arrive.
Start with the screen size. Mark the screen centerline. Place the chairs where people will actually sit. Place the projector lens on the centerline, not merely the table.
Turn keystone off and open a menu, grid, or paused title screen. If the raw rectangle is close, focus the image and use small correction only at the end. If it is badly skewed, change the physical position.
Only after that should you add the power route. If the cord has to cross the main path diagonally, the projector position is not final yet.
The corrected layout has three boundaries
A good small patio projector layout protects three things at once: the image axis, the seating zone, and the edge route. If one of those fails, the setup usually becomes annoying even when the movie is watchable.
The corrected version may look less dramatic than the oversized version, but it works better. Keep the lens on centerline, keep the beam clear of chair backs, and keep the cord route along the patio edge instead of through the walking path.
When changing equipment finally makes sense
Changing equipment makes sense only after the layout limit is clear. If the projector cannot sit on the centerline without blocking chairs, a short-throw projector may solve the actual problem.
If the patio depth is under about 8 feet and you still want a large image, a standard-throw projector may simply be the wrong category for the space.
A freestanding screen also makes sense when the only wall is angled, textured, or poorly positioned. But a new screen will not fix a projector that is too high, too close, or aimed across the patio.
The priority is simple: square the target, choose a screen size the patio can support, protect the walking route, and then decide whether the current projector belongs there.
Power safety should not be an afterthought. Once the image layout works, check whether the cord route can stay out of the main path and away from wet patio edges.
Weatherproof Cable Management for Outdoor AV is the right follow-up when the picture works but the cable route still feels risky.
Quick Placement Checklist
- Measure lens-to-screen distance, not wall-to-screen space.
- Match screen width to the projector’s throw ratio before choosing 100 or 120 inches.
- Keep the projector lens close to the screen centerline.
- Turn keystone off before judging the raw image shape.
- Keep the first seating row roughly 7 to 10 feet from a 90- to 100-inch image.
- Preserve at least a 30-inch walking route.
- Route power along the patio edge before calling the layout finished.
Questions People Usually Ask
Can I just use a blank patio wall?
Yes, if the wall is smooth enough, square to the projector, and facing the seating area. If the wall is angled or heavily textured, it may create distortion or uneven focus even when it looks acceptable from a distance.
Is auto-keystone bad for outdoor movies?
No. It is useful for small cleanup. The problem starts when auto-keystone has to rescue a badly angled setup every time.
Should the projector go in front of or behind the chairs?
Use the position that keeps the image square, the beam clear, and the walking route open.
On many small patios, a short-throw position in front of the chairs works better than forcing a standard projector behind seating where it needs more depth than the patio can give.
For projector-specific throw-distance calculations, use the ProjectorCentral Projection Calculator.