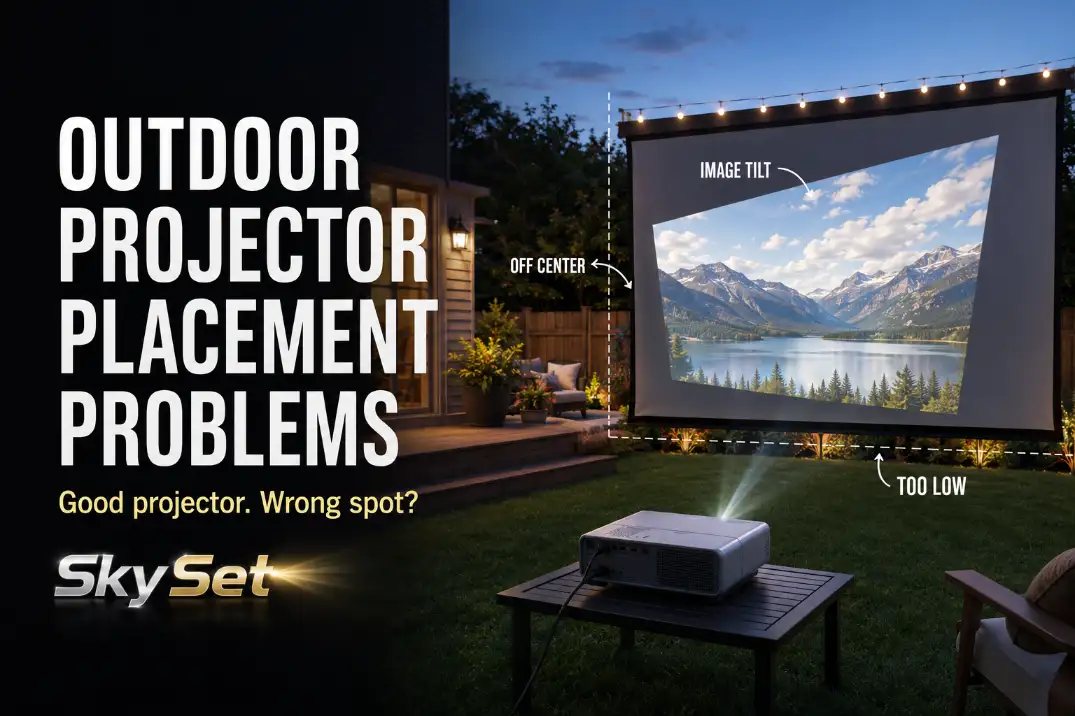
Outdoor projector placement problems usually start with geometry, not picture quality. If the image is cropped, trapezoid-shaped, soft on one edge, drifting during the movie, or forcing people to walk through the beam, the first checks are throw distance, lens height, centerline, ground level, cable route, and seating angle.
Brightness can matter outdoors, but brightness will not fix a projector sitting 18 inches too low or several feet off the screen centerline.
The quickest useful test is simple: place the lens on the screen centerline, keep the projector level, and see whether the image nearly fits before heavy keystone correction.
A setup that needs maximum keystone, a tilted table, or a cord stretched across the seating path is not solved by fine-tuning settings. It needs a better physical position.
Throw Distance
Start With the Lens-to-Screen Distance
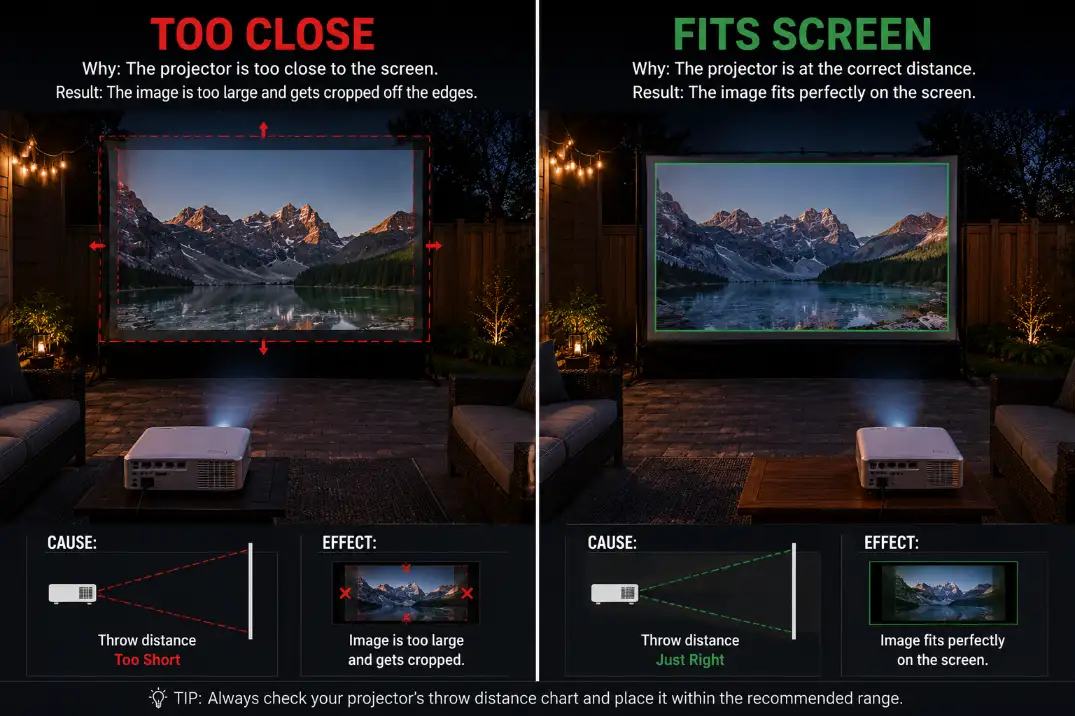
Throw distance is the first placement issue to rule out because it decides whether the projector can physically make the image size you want.
If the picture spills past the screen or will not grow large enough, the problem is usually not focus. It is the distance between the lens and the screen.
A common standard-throw projector may need roughly 8 to 12 feet to fill a 100-inch screen, while a short-throw projector can need much less.
That is why two projectors can behave completely differently in the same backyard. The screen size may be the visible target, but the projector’s throw ratio is the real limit.
Do Not Measure From the Table Edge
The common mistake is adjusting zoom and focus before measuring the lens position. Measure from the projector lens to the screen surface, not from the back of the table or the patio edge.
On a small patio, even 10 to 12 inches can decide whether the image fits cleanly or crops at the edges.
A healthy setup has some adjustment left after the image fills the screen. A weak setup only works with zoom maxed out, the table pushed into a walkway, or the screen moved to a worse location.
If the image only fits in one awkward spot, the layout is already warning you.
This is why projector placement should come after the screen location but before seating details. The broader order in Backyard Theater Planning Checklist is useful because it keeps the projector from being chosen or positioned before the yard has been tested.
Setup Note: Mark the working lens spot with painter’s tape after the image fits. The table can move later, but the lens position is the measurement that matters.
Screen Height
Check the Viewing Height Before Raising the Screen
Screen height is easy to misdiagnose because the image may look technically acceptable while the viewing experience feels wrong.
A screen that is too high creates neck strain. A screen that is too low gets blocked by chair backs, heads, coolers, pets, or the projector table itself.
For many backyard setups, the bottom of the screen works best around 24 to 36 inches above the ground. That gives the image enough clearance without forcing the screen center too high.
The exact height depends on seating, but if everyone is looking sharply upward, the screen is probably too high for the space.
Keep the Projector From Aiming Upward
Screen height and projector height cannot be solved separately. If the screen center is high but the projector sits on a 20-inch coffee table, the lens has to aim upward. That upward tilt is what creates keystone pressure.
A better setup keeps the projector lens closer to the lower half of the screen while staying level. Many portable backyard setups work better on a stable 28- to 36-inch table or stand than on a low patio side table.
Stacked boxes may rescue one night, but they also create vibration, wobble, and alignment drift.
The point is not to make the projector high for its own sake. The point is to reduce the amount of tilt needed before the image even reaches the screen.
Level Ground
Watch for Drift After the Projector Settles
Level ground is underestimated because outdoor slopes rarely look dramatic. A patio may slope only 1/8 to 1/4 inch per foot for drainage, but the projector follows that angle if the table follows the patio.
The visible symptom is a tilted or drifting image. The mechanism is a projector body that is not square to the screen.
This is especially common when the picture looks fine at sunset and starts looking wrong 30 to 60 minutes later. People move around, the table settles, or a soft patch of grass sinks under one leg.
Refocusing is tempting, but focus is not the first fix if the projector position has physically changed.
Level the Surface Before Correcting the Image
Level the projector surface before touching keystone. A firm stand, a small adjustable platform, or a stable shim under a table leg is better than wedging random objects under one side of the projector.
The goal is simple: the projector should sit flat, and the lens should face the screen squarely.
In small yards, this gets less forgiving because there may be only one realistic screen wall and one realistic projector zone.
If you are working with a tight patio, the placement limits in Small Patio Projector Placement Problems are closer to the real problem than general backyard setup advice.
Keystone Limits
Keystone Can Hide the Shape Problem
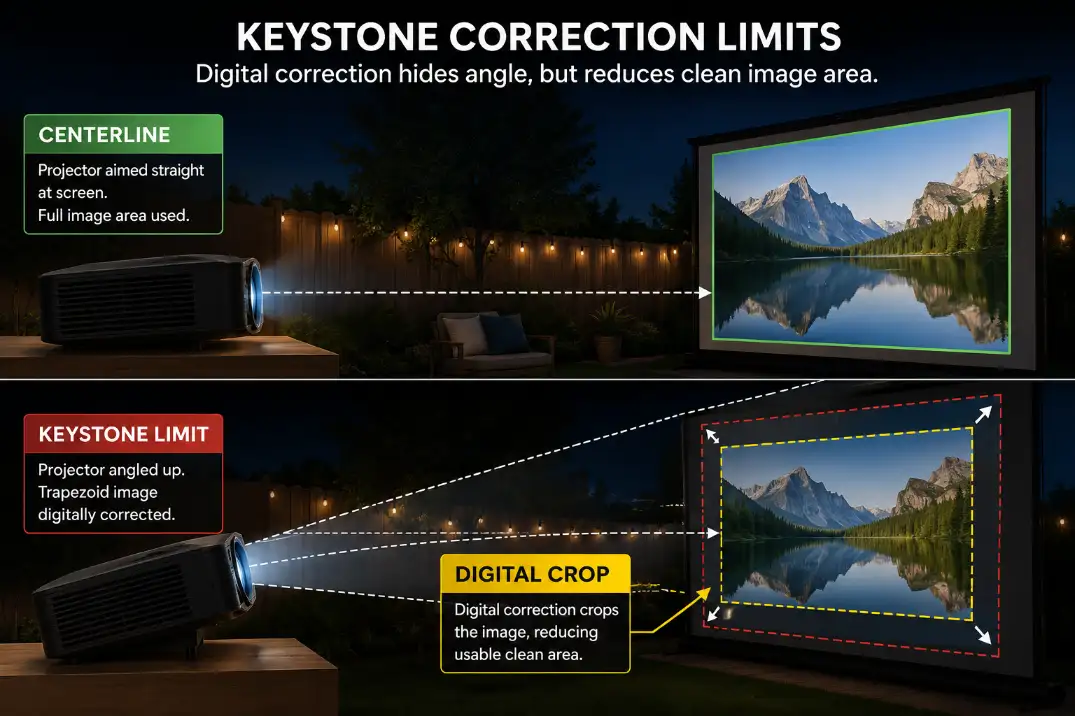
Keystone correction is helpful, but it is often overestimated. It can make a tilted image look rectangular. It cannot move the lens, level the ground, improve the throw distance, or recover all the detail lost by correcting a badly angled image.
A little keystone is normal in a real backyard. Heavy keystone is a warning. If the projector needs maximum vertical correction, strong horizontal correction, or both at once, the placement is doing something wrong.
Use Keystone as a Final Trim
A good setup looks close before digital correction. The projector is near the screen centerline, mostly level, and within its working throw distance. Keystone then becomes a small finishing tool.
A weak setup uses keystone to hide a projector that is too low, too far sideways, or aimed upward at a high screen.
The final picture may be rectangular, but subtitles, fine detail, and edge sharpness often suffer. This is the point where a routine fix stops making sense. More correction is not the answer; moving the projector is.
If the projector has optical lens shift, use that before relying on keystone. Lens shift adjusts the image position optically, while keystone digitally reshapes the image.
Many budget outdoor projectors have little or no lens shift, which means physical placement matters even more.
Cable Reach
The Best Picture Spot Still Needs a Safe Cable Route
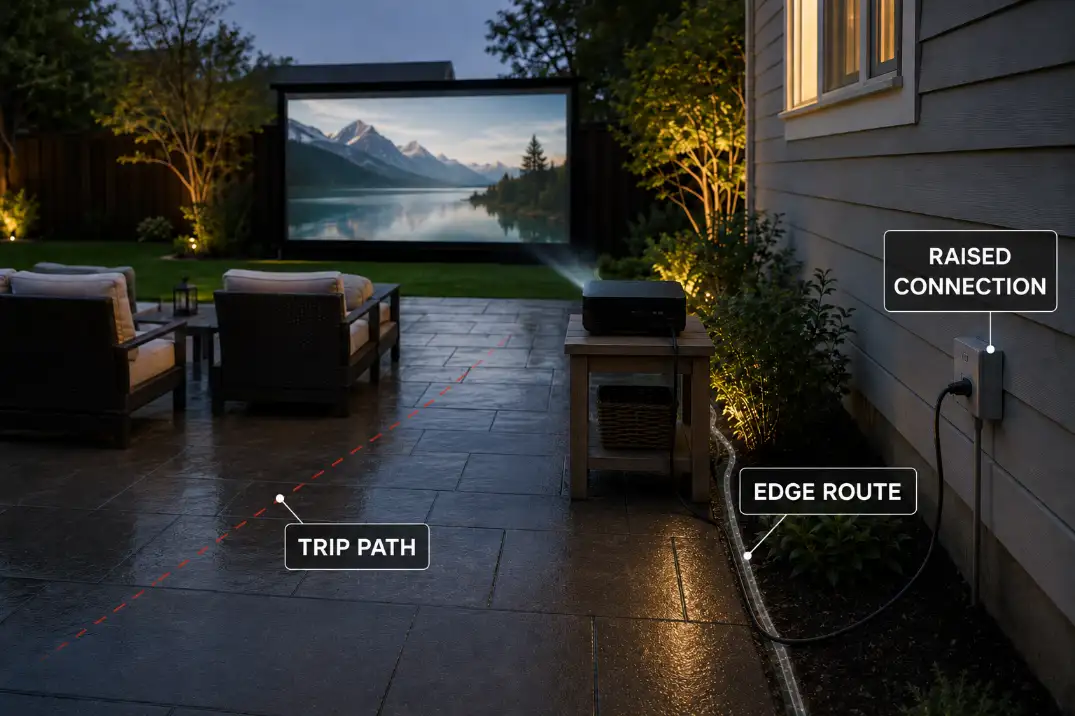
Cable reach is not just a convenience issue. It decides whether the projector can safely stay in the spot where the image actually works.
A perfect lens position becomes a bad setup if the power cord crosses the seating path, lies in damp grass, or pulls tight when someone moves a chair.
A longer cord is not automatically the fix. The useful question is not only “does it reach?” It is “does it reach without crossing traffic, sitting near wet ground, or forcing the projector table into the beam path?”
Route Quality Matters More Than Extra Length
A cleaner cable route follows a patio edge, wall line, fence line, or behind-seating path. A weak route cuts diagonally through the audience area. Leave slack at both ends, keep connections raised, and avoid placing plug connections where rainwater, irrigation, or spilled drinks can collect.
For projector-specific power hazards, Backyard Projector Power Setup and Cable Hazards is the better next step because it focuses on temporary outdoor power placement, not just picture alignment.
Signal cables can also create false picture problems. A long or poor HDMI run may flicker, drop signal, or fail when moved. For simple temporary setups, staying around 25 feet or shorter is often easier unless the cable is active, tested, and routed safely.
Seating Alignment
Align the Main Seats Before Filling the Edges
Seating alignment is the last placement check because it decides whether the corrected picture actually feels good to watch. A screen can be square, focused, and bright while the main seats sit too far to one side.
The most important seats should face the center of the screen, not the projector table.
A practical backyard target is to keep the main seats inside a comfortable center viewing cone, roughly within 15 degrees of the screen centerline when the space allows.
Side seats can work for casual overflow, but they should not define the layout.
Keep the Beam Out of the Walking Path
A common mistake is centering the screen on the patio wall and then arranging chairs around whatever furniture is already there.
The setup looks organized, but half the audience watches from a side angle or through the projector beam.
The better order is screen first, projector second, main seats third, overflow seats last. For family movie nights, this matters even more because kids, snack tables, blankets, and walking paths compete for the same space.
The layout advice in Backyard Movie Night Family Setup is useful when the projector location starts getting crowded by the rest of the night.
If people keep stepping through the beam, the projector is not in a usable location even if the image fits. Move the walking path, move the projector, or reduce the screen size before accepting constant interruptions.
Placement Symptom Map
| Symptom | Most Likely Placement Cause | First Fix |
|---|---|---|
| Image spills past the screen | Projector too far or wrong throw range | Recheck lens-to-screen distance |
| Image is too large and cropped | Projector too close | Move lens back or reduce image size |
| Trapezoid image | Projector tilted or off-center | Level and center before keystone |
| One edge looks soft | Heavy correction or angled screen | Square the lens to the screen |
| Picture drifts after 30–60 minutes | Soft ground or unstable stand | Stabilize and level the surface |
| People cross the beam | Projector sits in traffic path | Move projector or reroute seating |
What to Fix First
Start with the physical setup before the menu settings. Put the screen where it can stand safely, measure the working throw distance, place the lens on the screen centerline, raise or lower the projector until it can stay level, then use keystone only as a final trim.
After the image is physically close, check the cable route and seating cone. This order prevents the most common wasted fix: spending 20 minutes adjusting keystone and focus on a projector that is still sitting in the wrong place.
Brightness should be checked later, not first. If the picture is washed out but square and properly aligned, brightness and ambient light become the next issue.
That is a different diagnosis, and Outdoor Projector Brightness is the better place to handle that problem.
A smaller clean image usually beats a larger corrected one. If a 120-inch image forces heavy keystone, unsafe cable routing, or bad seating angles, a 100-inch image in a better position will often look sharper and feel easier to watch.
Questions People Usually Ask
Can I place an outdoor projector off to the side?
A little side placement can work if the projector has enough lens shift or mild correction. If the setup needs strong horizontal keystone, the projector is too far off-axis for a clean picture.
How high should an outdoor projector be?
The lens should usually sit close enough to the screen’s lower half that the projector can aim mostly straight ahead. For many portable backyard setups, a stable 28- to 36-inch stand works better than a low coffee table.
Is a bigger screen causing the placement problem?
Sometimes, yes. A bigger screen needs more throw distance, more stable screen support, and better seating alignment.
If the projector only fills the screen at the edge of its range, reducing the image size may solve more than extra correction.
For broader official safety guidance on temporary cord use, see the U.S. Consumer Product Safety Commission extension cord safety guide.