Short throw projectors help when the backyard problem is distance, not when the image is dim, washed out, or poorly aimed.
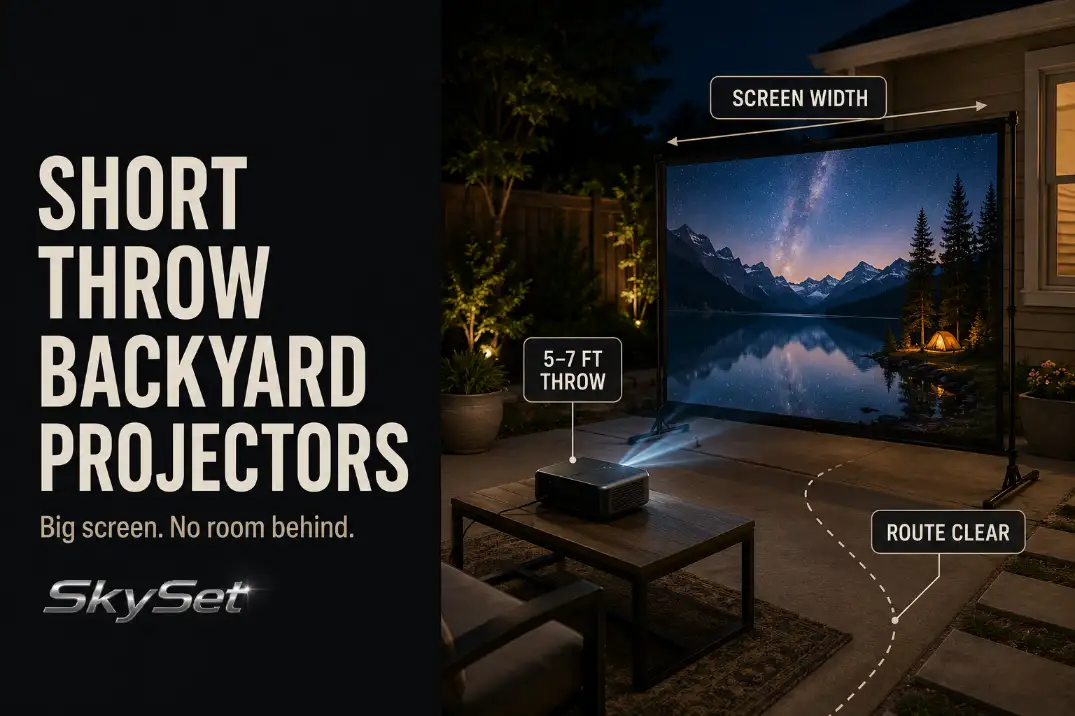
If the lens can only sit 5 to 8 feet from the screen before it blocks chairs, cables, or the walking route, short throw may solve a real setup problem.
The first checks are lens-to-screen distance, usable screen width, and whether at least 30 inches of clear movement remains around the seating area.
The mistake is treating short throw as a universal outdoor upgrade. It is not. A short throw lens can make a larger image from a tighter position, but it will not fix weak brightness, a screen hit by patio light, a wrinkled surface, or a projector sitting far off center.
The better question is simple: does your backyard need a shorter beam path, or does it need better darkness, better alignment, or a smaller image?
When Short Throw Helps
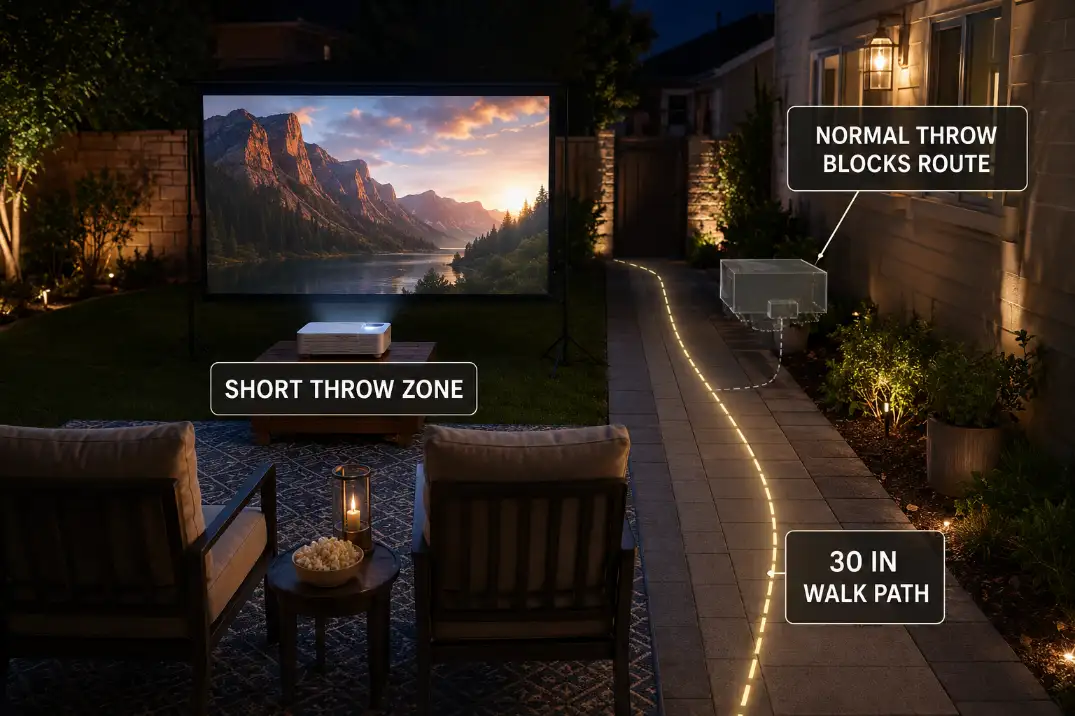
Short throw helps when a standard projector would have to sit too far back for the backyard to work comfortably.
That usually happens on small patios, narrow decks, covered patio edges, side yards, and compact lawns where the screen, seating, power route, and walking path all compete for the same 8 to 12 feet.
Distance problem, not brightness problem
The cleanest use case is a distance bottleneck. A normal projector may need roughly 8 to 12 feet to create a large outdoor image, depending on the model and image size.
A short throw projector may create a similar image from about 3 to 8 feet. That difference matters when the normal projector position would land behind the chairs, across the door route, or directly in the cable path.
This is why short throw is often less about the projector and more about the scene. If you are still choosing the entire system, it is safer to compare projector, screen, sound, and power together instead of buying a lens type in isolation.
A starter-oriented setup like Best Backyard Movie Setup is often the better first decision path when the yard layout is not yet fixed.
Brightness is different. If the picture looks weak 30 to 45 minutes before full dark, short throw is probably not the fix.
The image may still need a brighter projector, a smaller screen size, better light control, or a darker viewing window. Moving the projector closer does not remove sky glow, porch light spill, or contrast loss.
Alignment problem, not keystone problem
Short throw can also expose alignment mistakes faster than a standard setup. Because the beam widens quickly over a short distance, a small projector angle can create obvious shape problems at the screen.
A little keystone correction is normal in portable setups. Needing heavy correction every night is a sign that the projector position is wrong.
The underlying mechanism is lens geometry. Keystone correction straightens the image after the projector has already created a trapezoid.
It can make the picture look rectangular, but it does not turn a bad lens position into a clean physical setup.
Setup Note: Before buying, mark the planned projector spot with tape and measure from the lens location, not the back of the table.
Small Patio Limits
Small patios are where short throw projectors look most attractive, but they are also where weak planning shows up fastest. The projector may fit the distance perfectly while the rest of the setup still feels cramped.
Patio depth matters more than total yard size
A backyard can be 20 feet deep and still have only 9 feet of usable patio depth. That matters because the screen may need 1 to 2 feet of clearance from a fence or wall, chairs may need 3 to 4 feet of sit-down depth, and the walking route still needs about 30 inches to feel usable.
Add a projector table, speaker position, and power route, and the open distance disappears quickly.
That is why short throw should not be judged only by whether it can make the image size. It also has to keep the patio usable. If the projector table sits where people step around chairs, carry snacks, or move from the back door to the lawn, the setup may technically work but still feel annoying.
For tight patios, Small Patio Projector Placement Problems is the closer planning companion because the real problem is often not the projector lens. It is the screen centerline, chair depth, door route, or table position.
Covered patios add vertical pressure
Covered patios can make short throw more useful because the projector may stay closer to the house and better protected from dew or light rain drift. But the roof also limits height. A low table may force the lens upward. A ceiling shelf may put the projector too high. Either way, the image can become dependent on correction instead of clean alignment.
Ultra short throw projectors deserve extra caution outside. They can sit extremely close to the screen indoors, but backyard screens are rarely as flat, rigid, or precisely positioned as indoor UST screens. Ultra short throw is usually less forgiving outdoors than people expect because it depends on a very flat screen surface and precise projector height.
That does not mean ultra short throw cannot work outdoors. It means it is not automatically the easiest backyard option. For a portable screen on grass or patio pavers, a regular short throw projector with a little more distance can be more forgiving.
Screen Distance
Screen distance is the number that decides whether short throw makes sense. Not the total yard length. Not the diagonal size printed on the screen box. Not the table location. The useful measurement is from the projector lens to the screen surface.
Use image width, not just diagonal size
Throw ratio compares distance to image width. A 100-inch 16:9 image is about 87 inches wide, or roughly 7.25 feet. A projector with a 1.0:1 throw ratio needs about 7.25 feet from lens to screen for that width. A 0.7:1 short throw lens needs about 5.1 feet. A 1.5:1 projector would need about 10.9 feet.
That is the real reason short throw can help. It compresses the beam path without requiring the projector to sit in the seating row.
| Target Image | Approx. 16:9 Width | 0.7:1 Short Throw Distance | 1.2:1 Standard/Medium Distance |
|---|---|---|---|
| 80 in diagonal | 70 in / 5.8 ft | about 4.1 ft | about 7.0 ft |
| 100 in diagonal | 87 in / 7.25 ft | about 5.1 ft | about 8.7 ft |
| 120 in diagonal | 105 in / 8.75 ft | about 6.1 ft | about 10.5 ft |
| 135 in diagonal | 118 in / 9.8 ft | about 6.9 ft | about 11.8 ft |
These numbers are planning estimates. The actual projector model still matters because lens range, zoom range, and minimum focus distance vary. Some short throw projectors give very little placement flexibility, which matters outdoors because the setup may move slightly every time it is rebuilt.
Leave a movement buffer
Do not design the setup around the exact calculated distance. If the math says the lens needs to sit 5.1 feet from the screen, leave at least 6 to 12 inches of adjustment room. That buffer helps when the screen legs shift, the patio slopes, the table sits on a joint, or the projector needs to move slightly to center the image.
This is where people underestimate the difference between a permanent indoor room and a backyard setup. Outdoors, the screen is often temporary, the surface is not perfectly level, and the cable route may change depending on where people sit. A projector that only works in one exact position can become irritating even if the image looks good once.
If the whole patio layout is still being shaped, Outdoor Movie Setup Small Patios helps connect screen distance with seating, table placement, and movement flow instead of treating projector throw as a standalone spec.
The safer setup is the one with a little adjustment space left after the image size, seating depth, and walking route are all placed.
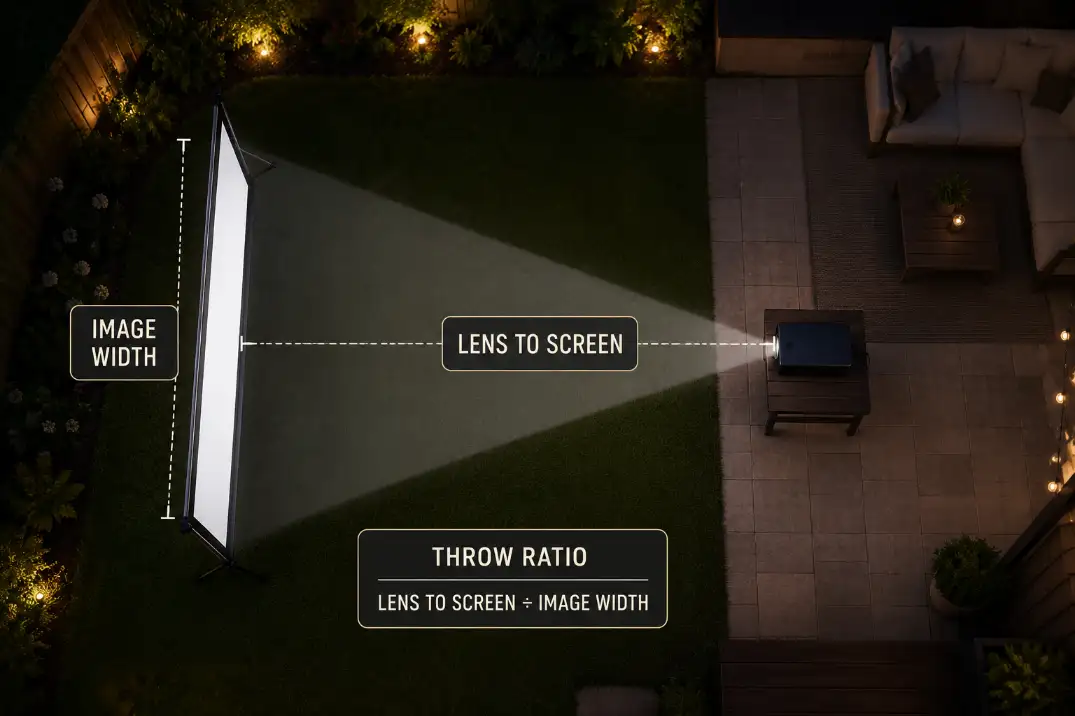
Image Size
The biggest short throw mistake is choosing the largest image the projector can make instead of the largest image the backyard can support. A 120- or 135-inch image sounds better than 100 inches, but in a small outdoor space it can create edge softness, screen spill, and uncomfortable viewing.
A stable 100-inch image can beat a messy 120-inch image
For many compact patios, a 90- to 110-inch image is the practical range. It is large enough to feel like an outdoor movie night but still easier to contain on a portable screen. It also keeps the projector from sitting so close that small alignment mistakes become obvious.
A 120-inch image can work beautifully if the screen is stable, the yard has enough depth, and viewers sit far enough back. But if the first row is only 7 feet from the screen, a 120-inch image can feel too wide for casual viewing. Viewers may have to turn their heads, subtitles may sit too far toward the edges, and small wrinkles in the screen become more noticeable.
The healthier comparison is not “bigger versus smaller.” It is controlled versus stretched. A contained 100-inch image with clean focus, clear route, and stable screen position usually beats a larger image that spills past the screen edge or needs constant correction.
Screen flatness matters more with short throw
Short throw beams widen quickly. That makes the screen surface more important. A slightly bowed screen, loose fabric corner, or tilted frame can create visible distortion faster than people expect. The center may look fine while the edges appear soft, stretched, or uneven.
This is one of the conditions readers commonly underestimate. They focus on projector specs and forget that a backyard screen is often the least stable part of the system. If the screen moves in a light breeze or leans forward on uneven ground, a short throw projector will not hide that problem.
For very tight yards, Small Backyard Movie Setup is worth checking because image size only works when it matches seating depth. The projector can shorten the beam, but it cannot create more viewing distance.
If the yard cannot support both the image width and the viewing distance, reducing the image is usually smarter than forcing the projector closer.
Placement Tradeoffs
Short throw projectors solve one placement problem by creating new decision points. That is not a reason to avoid them. It is a reason to use them only when the tradeoff is clearly better than a standard setup.
Cables may get shorter, but the front zone gets busier
A short throw projector often reduces cable length because it can sit closer to the screen and nearer to the house-side outlet. That can be a real advantage. A 6-foot projector route along the patio edge is usually safer than a 12-foot cord crossing behind chairs.
But the screen zone can become crowded. The projector table may now share space with screen legs, speaker stands, kids on blankets, or a snack table. If the projector sits in the front activity zone, it may be easier to bump even though the cable route is shorter.
That is where Backyard Projector Power Setup Cable Hazards becomes part of the short throw decision. A shorter cable is only better if it also stays out of feet, chairs, and the natural path from the door to the seating area.
Keystone correction should not run the night
A few minutes of setup adjustment is normal. Ten to 15 minutes of tilting, resizing, keystone correction, and refocusing every movie night is a warning sign. At that point, the routine fix has stopped making sense.
The better fix may be a smaller image, a different screen location, a slightly higher table, or a projector with a throw range that better matches the yard. Software correction should finish the setup, not rescue it.
Brightness still has to match the image
Short throw does not change the outdoor brightness equation. A larger image spreads the same light over more area. That means a 120-inch image from the same projector will usually look dimmer than a 90- or 100-inch image, especially during twilight or near patio lights.
If the image looks acceptable at 90 inches but flat at 120 inches, the mechanism is light spread and contrast loss, not throw distance. In that case, Outdoor Projector Brightness is the stronger diagnostic path than buying a different lens type.
The better decision is to reduce image size or improve light control before changing projector type.

Quick Decision Checklist
Use this before buying a short throw projector for a backyard setup:
- The lens-to-screen distance is under 8 feet, and a standard projector would block seating or a walking route.
- The target image is realistic for the space, usually around 90 to 110 inches on small patios.
- The projector can move 6 to 12 inches forward or back without losing the setup.
- The screen surface is flat and stable enough that edge distortion will not dominate the image.
- The setup does not rely on heavy keystone correction every night.
- The main problem is not twilight washout, weak brightness, or patio light hitting the screen.
- The power route can stay along an edge instead of crossing the seating path.
Final Takeaway
A short throw projector is the right backyard choice when screen distance is the bottleneck. It is not automatically better for every outdoor movie night. It helps most when a standard projector would sit too far back, block the walking route, or force a long cable through the seating area.
For many small patios, the strongest setup is not the biggest image possible. It is a controlled 90- to 110-inch image from about 5 to 7 feet away, with the lens centered, the screen flat, the table protected, and the route still open. Once the setup depends on constant keystone correction, oversized image stretching, or a projector sitting in the front traffic zone, the smarter move is usually a smaller image, a better screen position, or a different projector type.
For model-specific throw distance checks, use the ProjectorCentral projection calculator.