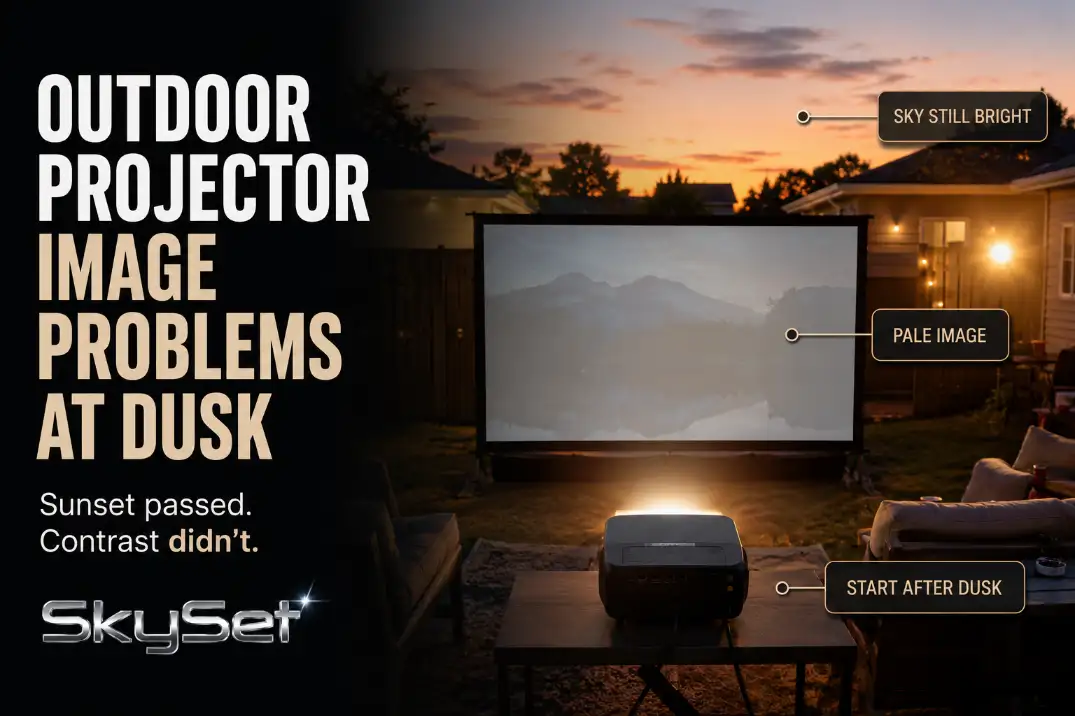
Outdoor projector image problems at dusk are usually not a projector failure first. The common pattern is sky-to-screen contrast failure: the projector is working, the screen is visible, but the sky is still bright enough to make blacks look gray and faces look flat.
Before changing settings or blaming lumens, check four things in order: start time, sun direction, screen angle, and image size.
A fair test usually starts 25–45 minutes after sunset, not at sunset. If a 90–100 inch image still looks flat 40–45 minutes after sunset, the problem is no longer normal twilight alone.
At that point, brightness, throw distance, screen exposure, or placement deserve attention. If the image improves every 5–10 minutes, waiting is still the strongest fix.
If it stays pale while the yard clearly darkens, something in the setup is still working against the image.
Twilight Washout
Twilight washout looks simple, but it is often misread. The screen is not blank. The projector is not necessarily out of focus. The real symptom is weak contrast across the whole image.
Gray blacks matter more than visible whites
At dusk, whites can appear visible while blacks collapse into gray. That makes people think the projector is “almost there,” when the image is actually missing contrast.
A focus problem makes text or edges soft. Twilight washout makes the entire picture feel thin.
That difference changes the fix. Focus rings, sharpness menus, and vivid presets do little when the sky is still brighter than the image.
If your picture keeps looking gray after the sky has gone deep blue, the deeper diagnosis in Outdoor Projector Washed Out fits better than another quick focus adjustment.
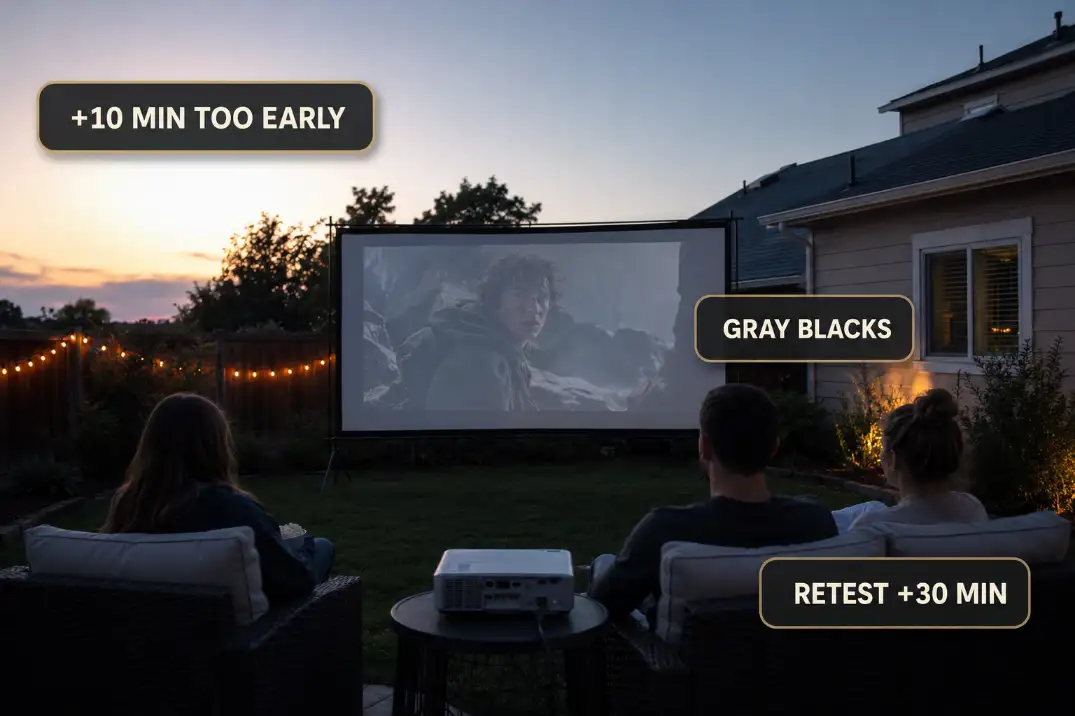
Normal dusk washout improves quickly
A normal dusk problem improves in visible steps. Check the screen, wait 10 minutes, and check again.
If black areas separate more clearly from the screen each time, the projector is probably not the main issue. The setup simply started too early.
A failing dusk setup behaves differently. The yard gets darker, but the screen still looks pale. The top half may stay washed out. Subtitles may be readable, but faces and shadows still lack shape.
That is the point where you should stop waiting and start looking at the screen’s relationship to the sky.
Sun Direction
Sun direction still matters after the sun disappears. Many dusk image problems happen because the screen, audience, or both are facing the bright side of the sky.
Sunset is gone, but the horizon is not
A west-facing screen can keep catching sky glow long after direct sun is gone. A west-facing audience has a different problem: the viewer’s eyes adapt to the brighter horizon behind or near the screen, so the projected image feels weaker than it really is.
This is why the same projector can look acceptable on one side of the yard and disappointing on another. The projector did not change. The background brightness did.
Shade is not the same as screen darkness
A pergola, umbrella, fence, or tree canopy may shade people without protecting the screen. That is the condition readers often overestimate.
They see shade over the seating area and assume the image will hold. But if the screen face still sees open evening sky, contrast can stay weak.
The useful field check is simple: stand where the screen will be 15 minutes after sunset and look toward the audience area.
If that view is still bright, the screen will probably struggle. Rotating the movie zone by 90 degrees can outperform a brightness upgrade when the original layout faces the wrong sky.
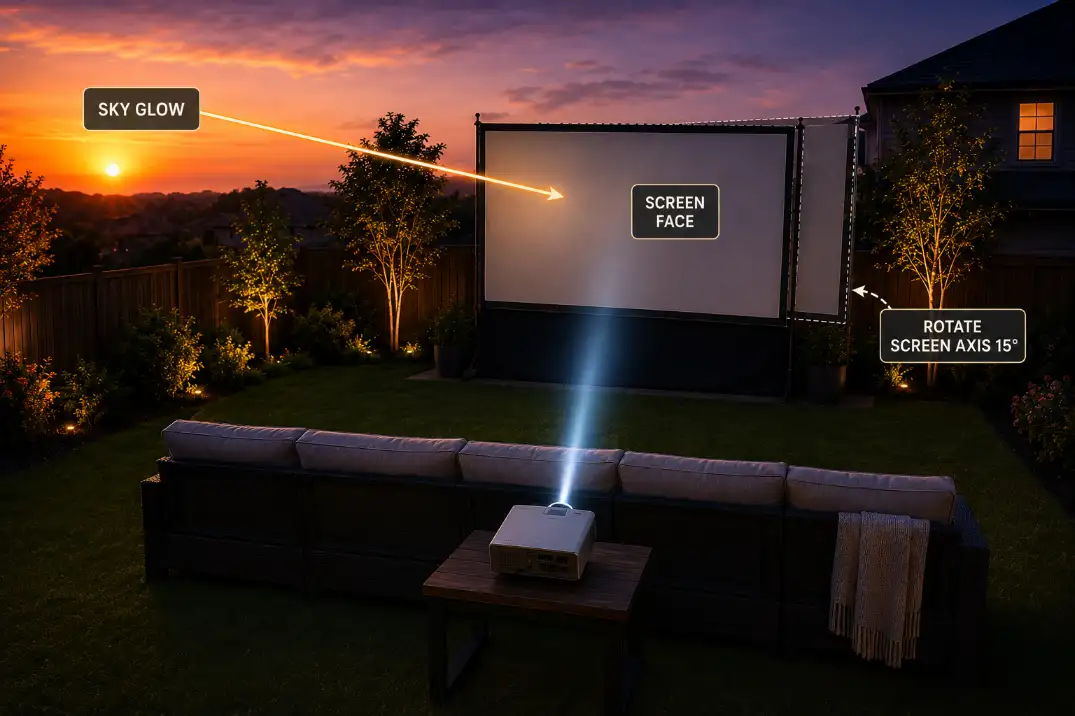
Screen Angle
Screen angle is where many dusk setups quietly fail. A screen can look straight, level, and clean while still catching ambient light from the worst direction.
A small rotation can change the image
The screen does not always need a dramatic move. A 10–20 degree rotation away from the bright horizon can reduce the sky glow hitting the screen face. That can make blacks feel more stable without changing the projector.
This is also where placement issues get mixed together. If rotating the screen creates a crooked image, extreme keystone, or a projector table that no longer sits on the screen axis, the problem has moved from dusk exposure into geometry.
The layout fixes in Outdoor Projector Placement Problems are more useful there than pushing brightness settings higher.
Gray and ALR screens are not magic dusk fixes
Gray screens and ambient-light-rejecting screens can help in the right conditions, but they do not cancel a bright sky from every angle.
If the screen is still facing the evening glow, a different surface may simply make the image dimmer before it makes black levels better.
This is the point where the standard fix stops making sense. If the movie is starting too early, screen material is a secondary correction. Time, angle, and size come first.
Tight yards have less angle freedom
In a small backyard or narrow patio, rotating the screen may immediately create throw-distance problems.
A short throw projector can help because it gives you more layout flexibility, but it still has to be centered and aimed properly.
If your screen can only sit 7–9 feet from the projector table, the distance guidance in Short Throw Projectors for Backyard Distance becomes part of the dusk solution, not just a buying detail.
Brightness Claims
Brightness matters, but dusk makes brightness claims easy to misread. The number on the listing is not the same as usable contrast on a large outdoor screen.
Image size can expose a weak setup
A projector spreads its light across the screen surface. A 120-inch image has about 44% more area than a 100-inch image, so the same projector looks weaker at the larger size.
At dusk, that extra size often shows up as gray blacks, dull faces, and a picture that looks acceptable only during bright scenes.
That is why the first brightness test should not be done at the biggest possible image. Start around 90–100 inches. If contrast holds there after the sky darkens, the projector may be fine.
If the image still looks flat at that size, the broader explanation in Outdoor Projector Brightness becomes more relevant.
The wrong upgrade wastes money
The wasted fix is buying a brighter projector while keeping the same early start time, west-facing screen, oversized image, and bright patio reflection. More brightness may help a little, but it does not remove the underlying contrast problem.
A better order is: start later, rotate the screen, reduce the image size, then judge the equipment. Once those three conditions are no longer working against the image, the buying choices in Best Backyard Movie Setup make more sense than chasing the largest advertised lumen number.
| What you see at dusk | More likely meaning | Better first move |
|---|---|---|
| Weak image 5–15 minutes after sunset | Normal twilight washout | Wait and retest |
| Image improves every 10 minutes | Timing problem | Start the movie later |
| Top half stays pale | Screen catching sky glow | Rotate or lower exposure |
| 120-inch image looks thin | Light spread too wide | Test 90–100 inches |
| Still weak after 40–45 minutes | Brightness, surface, or placement issue | Reassess setup and gear |
| Edges are soft but contrast is okay | Focus or keystone issue | Fix geometry first |
Tree and Fence Shadows
Tree and fence shadows can help, but they also create false confidence. A shaded yard does not always mean a protected screen.
Check the blank screen first
Before the movie starts, look at the blank screen. If it already has bands, patches, or moving leaf shapes, the projector will not hide them. The movie will inherit those uneven light patterns.
This is especially common when a fence blocks the lower screen while the upper screen still faces open sky. The lower half may look usable, but the top half stays washed out. That split image is not a projector defect. It is uneven ambient exposure.
Moving shadows can mimic projector instability
Breezy trees can make the picture appear to shimmer. Fence gaps can create thin bright strips. Nearby pale concrete can bounce light back toward the screen even after the sun drops. These are environmental problems, not menu problems.
The practical decision is whether the blank screen looks calm before projection begins. If it does not, move the screen or wait longer before judging the projector.
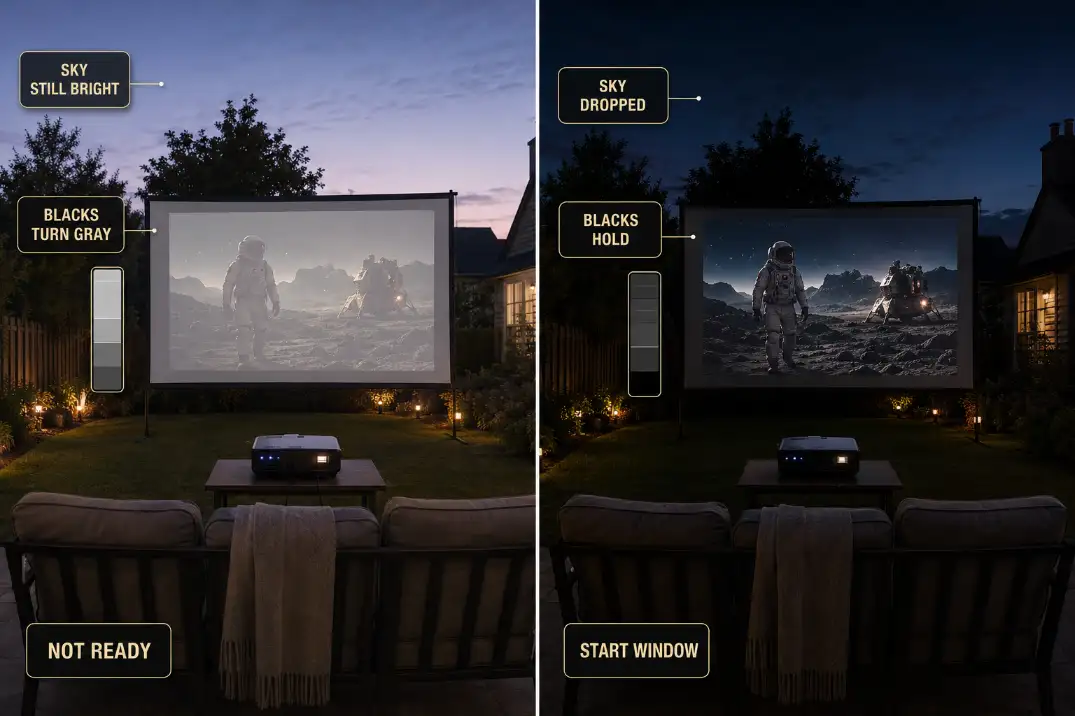
Best Start Time
The best start time is usually later than people want. Sunset is not showtime. Sunset is the beginning of the usable-image countdown.
Civil dusk is the better target
A strong backyard movie usually starts near civil dusk or shortly after it, when the sky is no longer bright enough for comfortable outdoor activity without added light.
In many U.S. yards, that means roughly 25–45 minutes after sunset, with longer delays in northern summer evenings and shorter windows in some dry western locations.
Humid or hazy evenings can stretch twilight glow. Pale stucco, light concrete, and open desert yards can keep reflecting brightness longer than expected. The exact clock time matters less than the screen test.
Let the screen decide
Use a paused high-contrast scene before starting the movie. Look for three signs: black areas separate from the screen, faces have shape, and subtitles are readable from the back row. If those three checks fail, the image is not ready.
For family nights, this creates a real planning tradeoff. Kids may need an earlier schedule, but earlier schedules demand a smaller image, a darker screen direction, or lower expectations.
The layout planning in Backyard Movie Night Family Setup helps because seating, snacks, and traffic paths should already be settled before the picture finally becomes usable.
Quick dusk image checklist
- Retest the screen 25–35 minutes after sunset before blaming the projector.
- Use 90–100 inches as the first fair image size.
- Rotate the screen 10–20 degrees away from the brightest sky.
- Check the blank screen for tree bands, fence shadows, or patio reflections.
- Separate focus problems from contrast problems.
- Consider new gear only after timing, angle, and image size have been corrected.
Final Takeaway
For outdoor projector image problems at dusk, solve the sky before you solve the projector. The strongest order is start later, turn the screen away from the brightest horizon, keep the image size realistic, and then judge brightness.
A new projector only makes sense after the yard, screen angle, and start time are no longer stealing contrast from the image.
For official civil, nautical, and astronomical twilight definitions, see the National Weather Service.