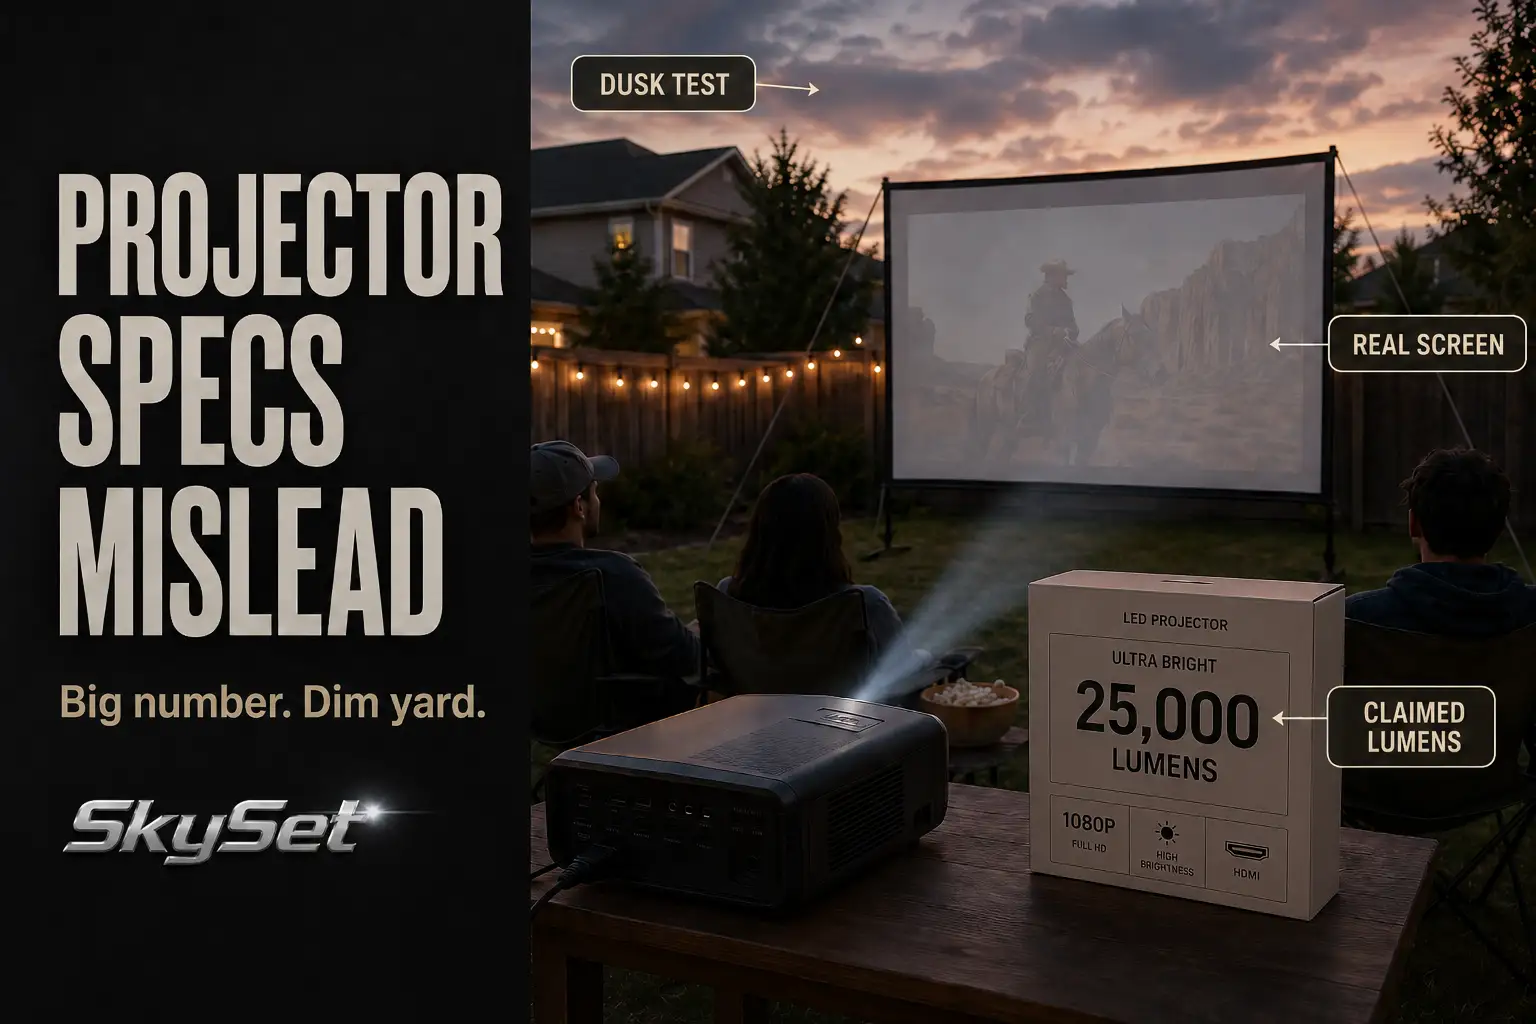
Projector specs mislead backyard buyers because the strongest-looking number on the product page is often not the number that survives the yard.
The first checks are not complicated: whether brightness is listed in ANSI lumens, whether the screen still looks washed out 20–40 minutes after sunset, whether the speaker reaches the back row, and whether battery mode keeps the same brightness you saw in the demo.
This is different from a blurry focus problem or a bad screen wrinkle. Those are visible setup issues. Misleading specs fail earlier in the buying decision: a vague lumen claim sounds bright, “supports 4K” sounds sharp, “built-in speakers” sounds complete, and “2.5-hour battery” sounds enough for a movie.
Outside, those claims meet a larger screen, open air, fading twilight, and real viewing distance. That is where many budget projectors stop matching their spec sheet.
Claimed Lumens
Treat vague lumens as a filter, not a buying reason
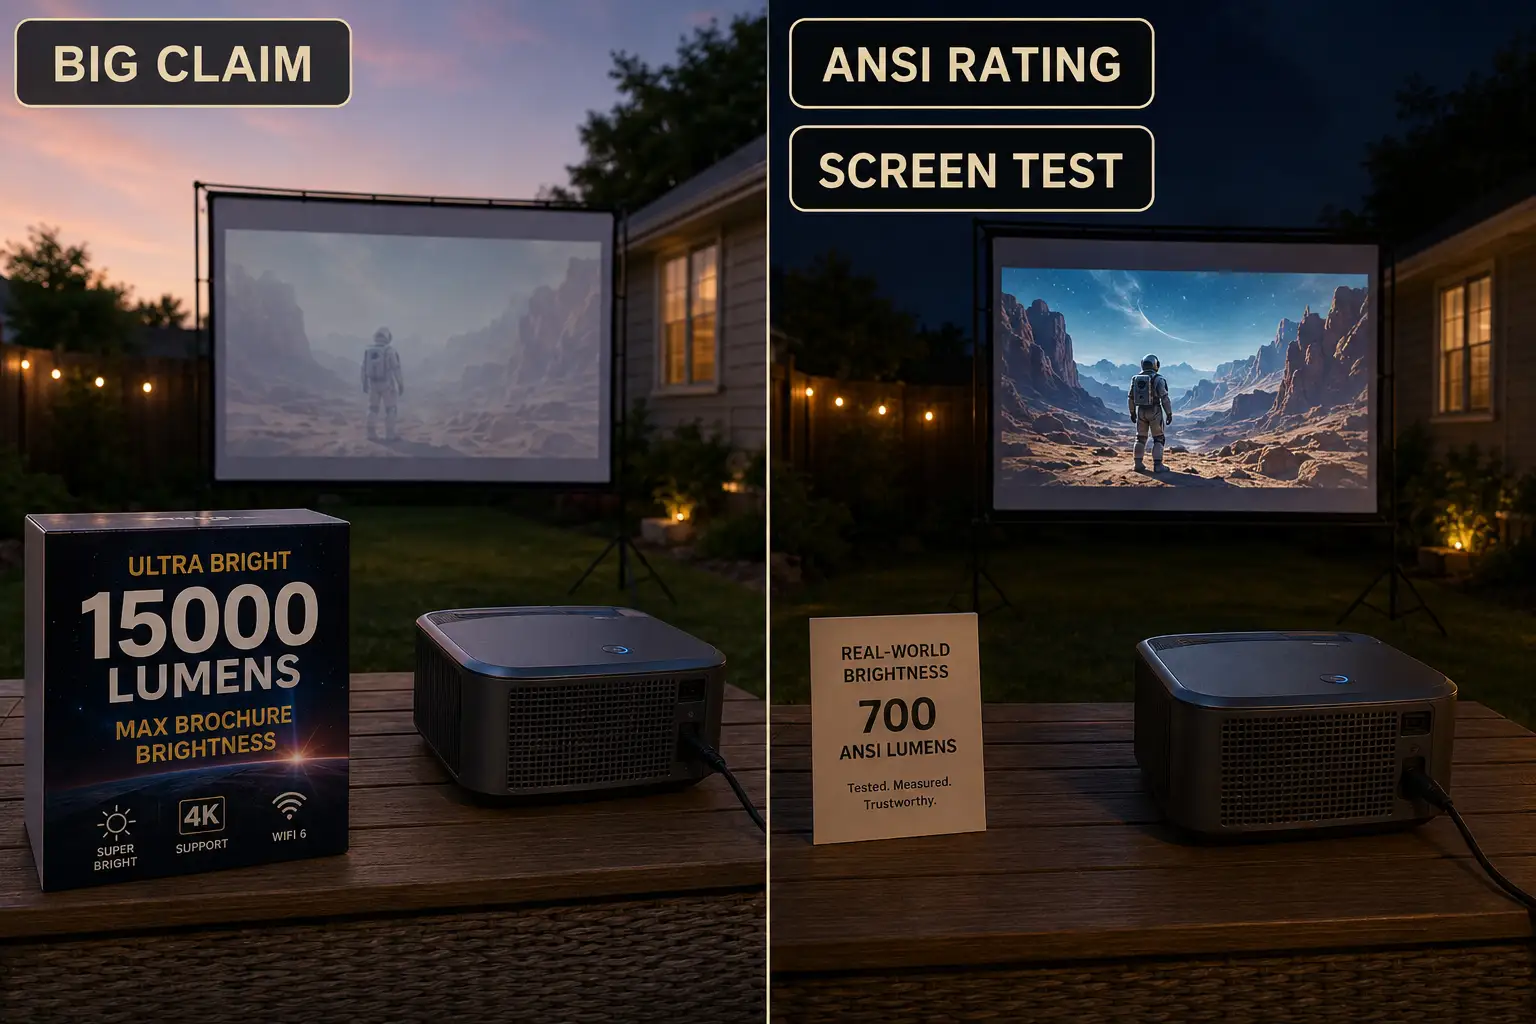
The biggest lumen number is often the least useful one. Some listings advertise 10,000, 12,000, or even higher “lumens” without making clear how that number was measured.
In a backyard, that is a problem because the screen is not sitting in a controlled dark room. It is competing with sky glow, porch lights, patio reflections, fence surfaces, and the size of the image itself.
A projector that looks punchy on a 60-inch indoor wall can look thin on a 100-inch outdoor screen. The same light output is being stretched across more surface area. That means a bigger image is not just “more cinematic.” It is also a brightness tax.
The common mistake is assuming a large claimed number means the projector can start right after sunset. If the screen border and the movie shadows both look gray, the projector may not be the only weak point. The yard may still be too bright for the image size.
A more useful buying question is: bright under what measurement, at what screen size, and at what start time? If a listing does not clearly separate marketing brightness from measured brightness, treat the number as a warning sign.
For a fuller brightness breakdown, the guide on outdoor projector brightness explains why screen size and darkness change the result more than most buyers expect.
The spec sheet hides the screen-size penalty
Claimed lumens also hide one of the most important backyard variables: image size. A projector does not become brighter because the screen gets bigger.
It only spreads the same output over more area. That is why 80 inches may feel usable while 120 inches feels dull from the same machine.
For backyard buyers, this is usually the first place to be selective. A projector with vague brightness language, no ANSI rating, and no realistic screen-size guidance is not a safe choice for a larger outdoor setup.
It might still work for a small late-night screen, but it should not be treated as a reliable movie-night projector for a family yard.
ANSI Lumens
ANSI lumens give a better starting point
ANSI lumens are not perfect, but they are harder to hide behind than vague brightness claims. They give buyers a more useful comparison point because they come from a more standardized measurement process.
That does not mean ANSI lumens alone guarantee a good backyard image. It means the number is at least closer to the condition you are trying to judge.
A small, fully dark setup may survive with roughly 500–800 ANSI lumens if the screen is modest, viewers sit close, and expectations are casual.
That is the narrow use case. It is not the same as saying 500–800 ANSI lumens is a strong outdoor recommendation.
For a 100-inch screen, nearby light spill, earlier start times, or a larger seating area, the safer buying range moves higher.
Around 1,000–2,000 ANSI lumens can be a workable middle range after full dark, but larger screens, earlier start times, or visible light spill push the safer target closer to 2,500+ ANSI lumens.
The point is not to buy the largest number automatically. The point is to stop comparing outdoor projectors as if every yard is a dark room.
Small-screen acceptable is not large-screen reliable
This is where many buyers get misled by reviews. A projector can look good in a controlled test and still disappoint in a suburban backyard with a white fence, a patio light, and a larger screen. The failure is not always dramatic. It often looks like a visible but flat image.
The most common wasted fix is buying a brighter projector before testing whether the current setup starts too early. If waiting another 30 minutes makes the image look dramatically better, the problem was not only projector output.
It was timing and ambient light. The guide on outdoor projector image problems at dusk is useful when the image looks fine indoors but loses strength before full dark outside.
Pro Tip: Judge brightness with one dark movie scene, not a colorful animation clip. Bright scenes can make a weak outdoor projector look more capable than it is.
Contrast Outdoors
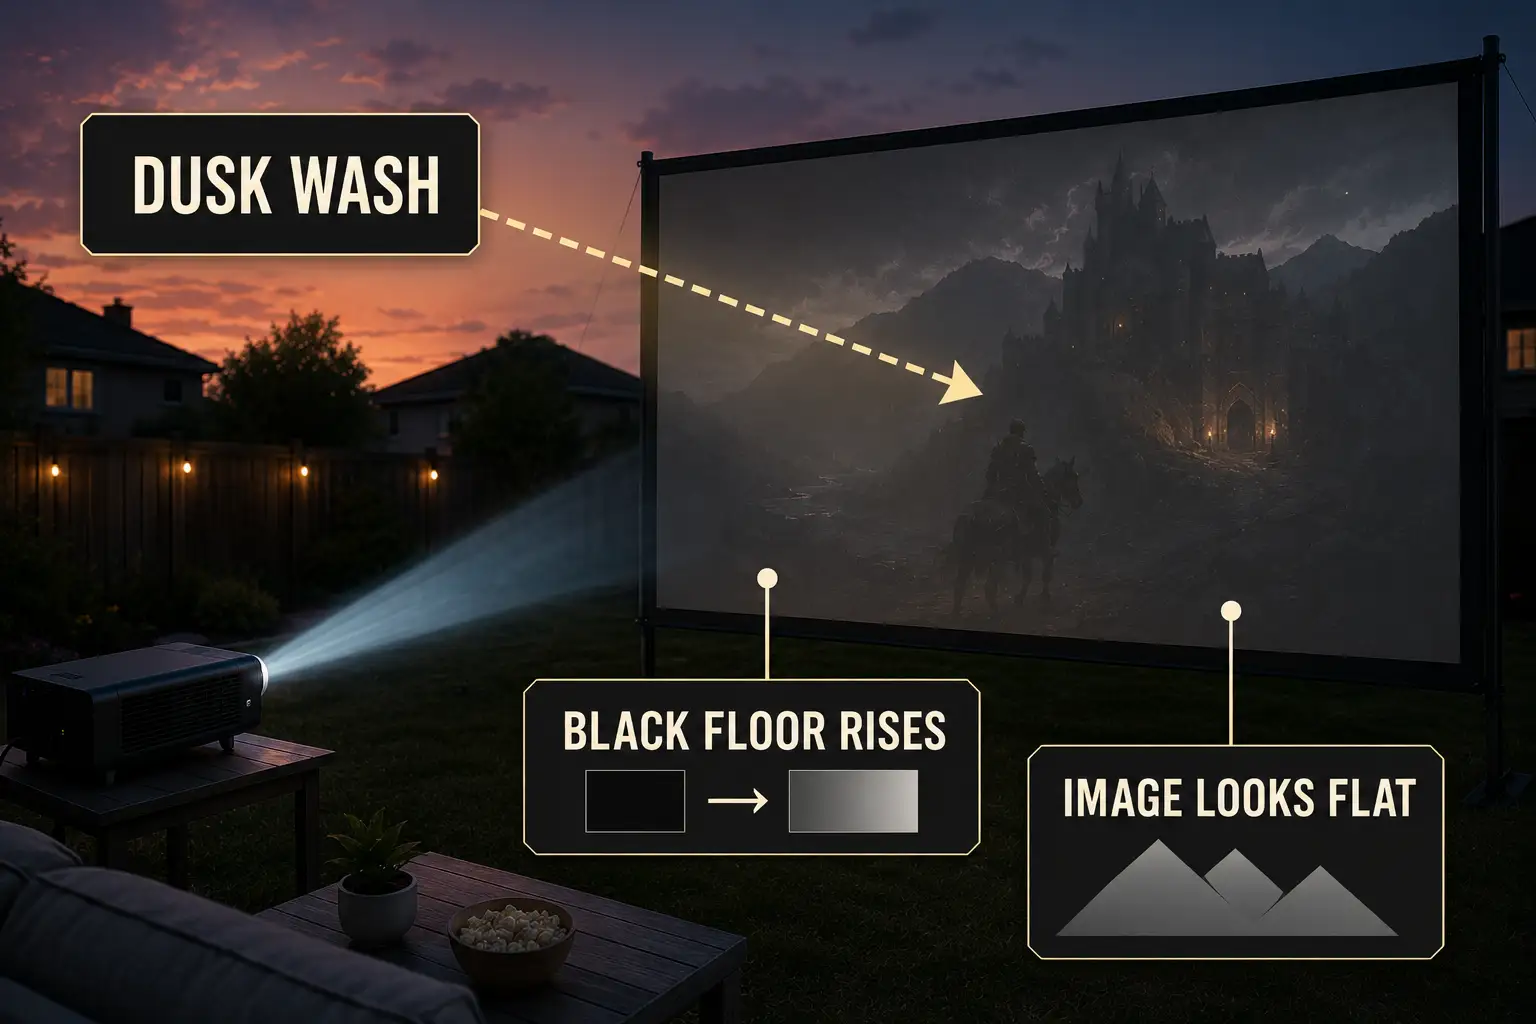
Outdoor contrast usually fails before the projector fails
Contrast ratio is one of the most misleading projector specs for backyard buyers. Indoor contrast claims are measured under conditions your yard will not repeat.
Outside, even a small amount of ambient light raises the black level on the screen. When that happens, shadows turn gray and the image loses depth.
The symptom is simple: the image is visible but not satisfying. The mechanism is more specific: the projector is still sending light, but the screen surface is also receiving light from the environment. That extra light fills in the dark parts of the picture.
This is why contrast specs collapse faster than brightness specs outdoors. A projector may technically have enough brightness for the screen, but if the yard keeps lifting the black floor, the movie still looks washed out.
Screen size and start time beat advertised contrast
A useful threshold is this: if dark scenes still look gray 30 minutes after sunset, and nearby lights are already controlled, the setup is probably asking too much from the projector, screen size, or screen surface.
If dark scenes improve sharply as the sky gets darker, the contrast problem is mostly environmental.
Buyers often underestimate how much a 20-inch screen-size jump changes the result. Moving from 80 inches to 100 inches is not a small cosmetic upgrade.
Moving to 120 inches can push a portable projector past the point where outdoor contrast feels convincing.
If the projector is centered, the screen is flat, and focus is sharp but the image still feels pale, the issue is no longer basic setup. It is the match between projector output, image size, and ambient light.
Built-In Speaker Limits
Speaker watts do not equal seating coverage
Built-in speaker specs are easy to overvalue because they look simple. A listing may mention 5W, 10W, dual speakers, or “cinematic sound,” but a backyard does not hold sound like a room.
There are no close walls reflecting dialogue back toward viewers. Sound spreads out, and small speakers lose clarity before they seem completely quiet.
The symptom is “the projector is not loud enough.” The mechanism is usually coverage. If the speaker sits inside or behind the projector, it may be 8–15 feet away from the front seats and even farther from the back row. Raising volume can make the sound harsher without making voices clearer.
For one or two people sitting close to the projector, built-in sound may survive. For a family row, a patio gathering, or a screen across the lawn, it usually becomes the first comfort failure.
If viewers ask “What did they say?” more than once in the first 15 minutes, volume is not the only issue anymore.
When louder becomes the wrong fix
A separate speaker near the seating area often improves the night more than a projector with a slightly louder built-in speaker. The goal is not just sound output. It is dialogue landing where people sit.
This is a good place to avoid a common upgrade mistake. Do not buy a projector mainly because it has a slightly stronger built-in speaker if the seating area is spread out.
Better sound placement usually beats more watts inside the projector body. The guide on why backyard movie sound feels weak outdoors covers that outdoor coverage problem in more detail.
Battery Claims
Test battery mode at the brightness you will actually use
Battery claims are often measured under easier conditions than a real backyard movie night. A projector advertised for 2.5 hours may reach that number in a lower brightness mode, with moderate volume, limited streaming demand, or controlled temperature.
Outside, the same projector may be running brighter, streaming over Wi-Fi, driving its own speaker, and sitting through a warm evening.
For real use, the battery margin should be larger than the movie length. If the movie is 1 hour 55 minutes, a claimed 2-hour battery is not a safe match.
A better target is at least 30–45 minutes of extra runtime beyond the content itself. That buffer covers setup delays, app loading, previews, connection problems, and brightness changes.
The sharper test is whether battery mode looks as good as plugged-in mode. A projector that only looks bright on AC power is not truly solving a backyard portability problem.
Portable does not always mean cable-free
The common overestimate is the word “portable.” Buyers often read it as “no power planning needed.” In reality, portable may only mean the projector is easy to move.
It may still need a safe power route, a charged power station, or an outlet plan if the battery mode is too dim or too short.
That changes the buying decision. A battery projector can simplify a small casual setup, but a corded projector can be more reliable for longer nights, larger screens, or repeat use.
If the setup starts to require extension cords, power banks, speakers, and streaming devices, the decision becomes less about portability and more about system design.
That is where portable vs permanent backyard theater becomes the more useful comparison.
Real Setup Test
Supported resolution is not the same as native resolution
Resolution specs can mislead in a quieter way than lumen claims. “Supports 1080p” or “supports 4K” does not always mean the projector displays that resolution natively. It may accept the signal and downscale it to a lower native panel.
This matters more outdoors because the image is often large. On a small indoor wall, a lower native resolution may pass casually. On a 100-inch backyard screen, text, subtitles, faces, and distant details can look soft.
If the listing does not clearly state native resolution, do not assume the highest supported input is the real image output.
For most backyard movie nights, native 1080p is a practical baseline if the screen is large enough for guests to notice softness.
Native 720p may still work for kids’ movies, casual use, or smaller screens, but it should not be mistaken for the same experience.
Confirm throw distance before chasing brightness
Throw distance is another spec that buyers often read too late. A projector can have enough brightness on paper and still fail because it cannot produce the desired image size from the available table position.
Small patios, narrow yards, and seating-first layouts make this problem more common.
If the projector has to sit in a walking path, too close to the screen, too far behind the seats, or off to the side, the spec sheet has already lost contact with the real yard.
Keystone correction can help a little, but heavy correction often reduces image quality and makes the setup feel compromised.
Before choosing a projector around brightness alone, measure the real distance from the projector position to the screen.
Then check whether that model can make the screen size you want from that distance. The guide on short throw projectors for backyard distance is especially relevant when the yard is too tight for a standard throw setup.
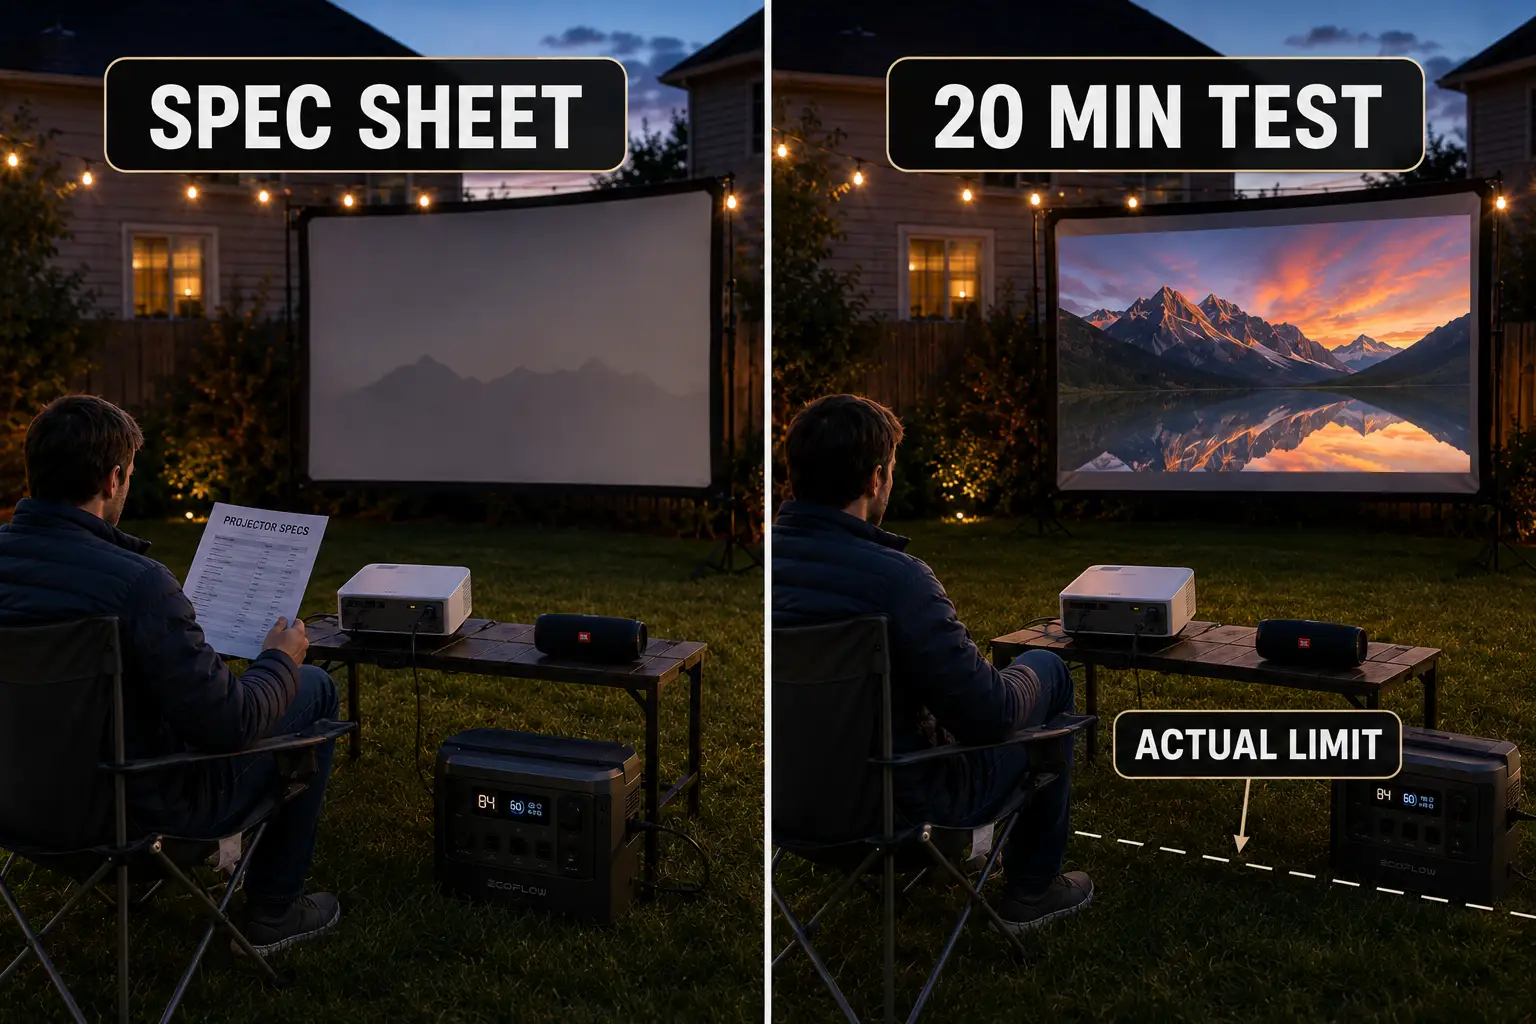
Run one 20-minute backyard test before buying up
The best projector test is not an indoor wall demo. It is a short outdoor trial using the real screen size, real seating distance, real start time, real sound plan, and either the real battery mode or the real power route.
Use this test before assuming you need a more expensive projector:
| Spec claim | Backyard reality to check | Practical warning sign |
|---|---|---|
| High lumens | Screen holds detail at your planned size | Image stays pale after full dark |
| High contrast | Dark scenes separate from the screen border | Blacks remain gray in normal scenes |
| Built-in speaker | Dialogue reaches the farthest seat | Volume rises but words stay muddy |
| Long battery life | Runtime beats the movie by 30–45 minutes | Battery barely matches content length |
| Supports 4K/1080p | Native resolution looks sharp at screen size | Subtitles and faces look soft |
| Flexible placement | Throw distance fits the real table location | Projector lands in a walkway or bad angle |
Do not upgrade brightness first if the screen is too large, the start time is too early, or the throw distance is wrong.
A brighter projector can help, but it will not fix every outdoor mistake. The smarter order is timing, screen size, placement, brightness, sound, and power.
Watch from the farthest seat, not beside the projector. Use one bright scene, one dark scene, and one dialogue-heavy scene. If the farthest seat gets weak sound, dull contrast, or a blocked view, the setup is not guest-ready yet.
Specs are filters, not promises. Eliminate vague brightness claims, weak battery margins, unclear native resolution, and speaker-only setups for larger seating areas.
Then judge the remaining projectors against the yard you actually have. A complete planning pass with the best backyard movie setup helps connect projector specs to screen size, seating, sound, and power instead of treating the projector as the whole system.
The projector worth buying is not always the one with the biggest advertised number. It is the one whose brightness, contrast, sound, battery, resolution, and placement still work after sunset, at your screen size, in your yard.
For broader official guidance on evidence-based advertising claims, see the Federal Trade Commission’s advertising and marketing basics.